
That floodwater soaking your belongings isn’t just dirty water. It’s sewage, chemicals, and bacteria that can make your family sick for weeks. You’ve got maybe 48 hours before mold explodes across everything you’re trying to save. Most people grab a towel and start wiping, which locks contamination in place instead of removing it. This guide walks you through the proper cleaning sequence: document first, protect yourself, sort what’s salvageable, remove debris, clean thoroughly, then disinfect correctly. Skip steps or flip the order and you’re living with hidden health risks that won’t show up until someone gets sick.
Essential Steps for Cleaning Flood-Contaminated Belongings
Floodwater carries bacteria, sewage, chemicals, and hazardous materials that turn ordinary stuff into health risks. You’ve got 24 to 48 hours to start cleaning before mold takes over, and it moves fast in wet environments. Just wiping things down or letting them air dry won’t cut it. Pathogens hide deep in porous materials and crevices you can’t see.
Here’s your cleaning sequence:
-
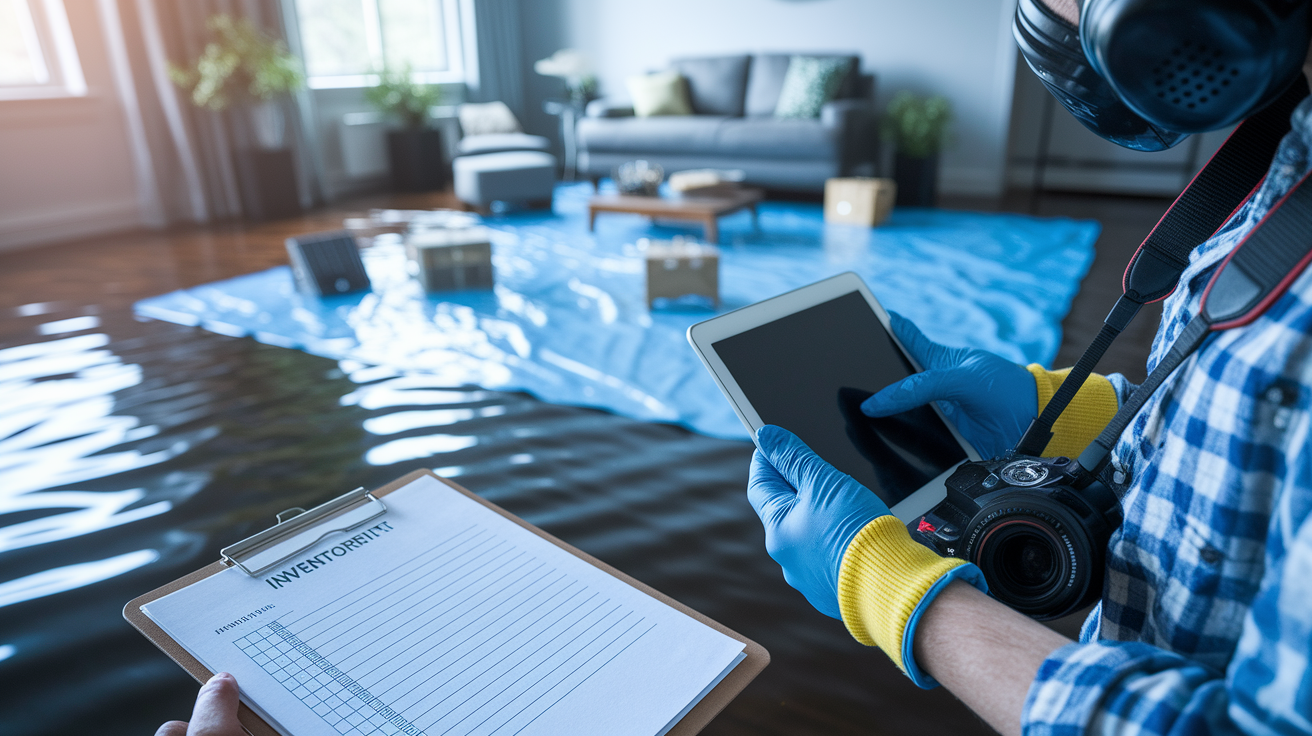
Document everything with photos, videos, and a written list before you move or clean a single item. Your insurance claim depends on it.
-
Gather proper safety equipment including boots, gloves, respirators, goggles, and protective clothing before you touch contaminated surfaces.
-
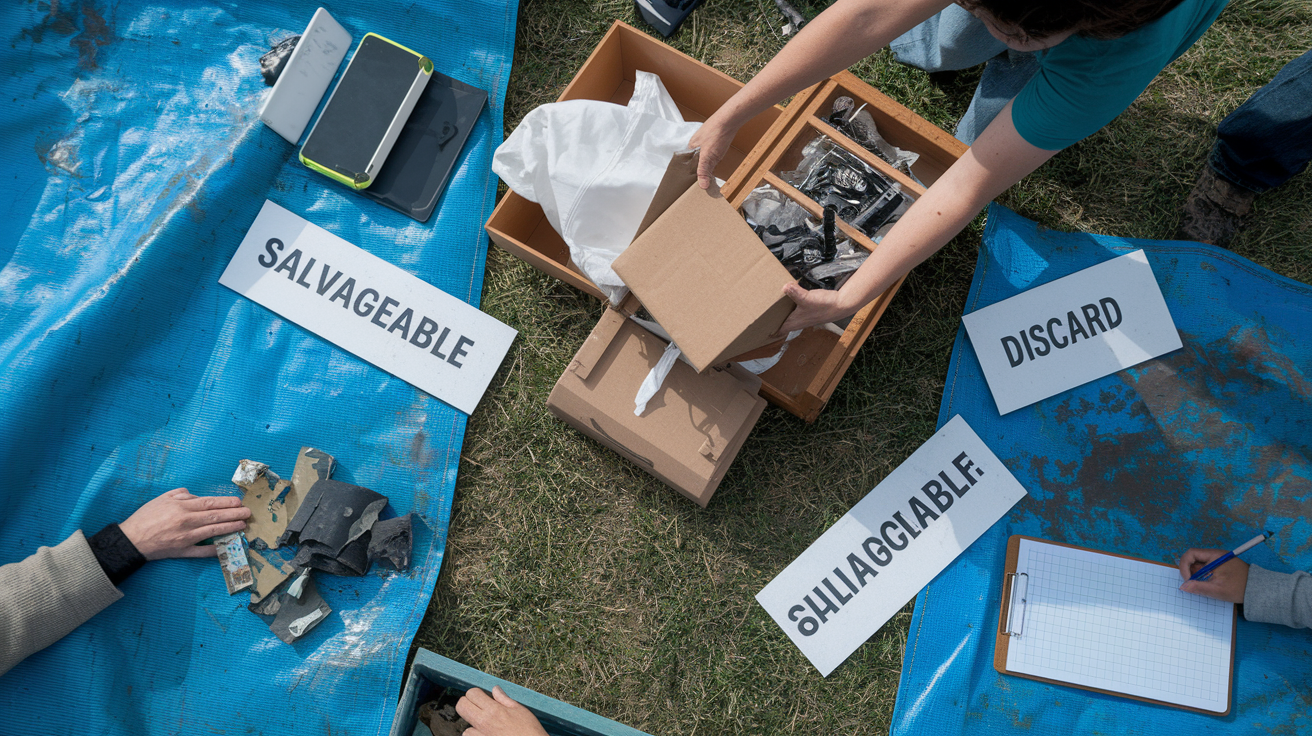
Sort items into salvageable and unsalvageable piles based on what they’re made of. Porous materials go to the curb. Non-porous items get set aside for cleaning.
-
Remove all debris including standing water, mud, silt, and loose contamination from the area and the items you’re keeping.
-
Clean surfaces thoroughly with phosphate-free detergent and water to get rid of all visible dirt and organic matter.
-
Disinfect cleaned surfaces using proper bleach solutions or approved disinfectants with the right contact times.
The clean first, then disinfect method matters because disinfectants can’t penetrate layers of mud, organic debris, or standing water. Cleaning removes the physical contamination. Disinfection kills the bacteria, viruses, and pathogens. Flip this order or skip the cleaning phase and you’ve locked contamination beneath a thin layer of disinfectant. False sense of safety while health risks stick around.
Safety Equipment and Protective Gear for Flood Cleanup

Floodwater carries sewage bacteria, chemical runoff, sharp debris, and biological hazards that enter your body through cuts, mucous membranes, and respiratory exposure. Direct contact with contaminated surfaces causes skin infections, gastrointestinal illness, and respiratory problems that can land otherwise healthy people in the hospital.
You need this protective equipment:
- High-ankle boots with protected toes to prevent puncture wounds from submerged nails, glass, and sharp debris while keeping contaminated water away from your feet
- Tear-resistant pants that won’t rip when you kneel or brush against rough surfaces, preventing skin contact with floodwater residue
- High-dexterity work gloves that protect your hands while maintaining enough grip to safely handle tools and contaminated items
- Hard hat to protect against falling debris, low ceilings in basements, and head injuries in unstable structures
- Safety goggles that seal around your eyes to prevent splash contamination and airborne particle exposure
- N95 or N100 respirator masks that filter out mold spores, bacteria, and airborne contaminants that standard dust masks can’t block
- Full Tyvek suit for working in mold-contaminated areas, creating a barrier between your clothing and contaminated surfaces
- Rubber gloves worn over work gloves when handling sewage-contaminated materials or mixing bleach solutions
Replace your respirator mask using the five Ds rule: when it’s Dirty from visible contamination, Damaged with tears or broken straps, Damp from sweat or water exposure, Deformed from being crushed or stored wrong, or Difficult to breathe through because the filters are clogged. A compromised mask offers zero protection. Keep a spare on hand so you can swap immediately when one fails during extended cleanup work.
People with immune system disorders, COPD, chronic asthma, or other respiratory conditions shouldn’t enter flood-damaged areas until professional cleaning is complete and air quality testing confirms the space is safe. The contamination levels and mold spore concentrations in flood-damaged buildings can trigger severe medical emergencies in vulnerable individuals.
Pre-Cleaning Preparation and Debris Removal from Flood-Damaged Items
Take photos and videos of every room, every damaged item, and every watermark before you touch anything. Your insurance adjuster needs visual proof of damage extent and item condition. Walk through each space with your phone recording video while you narrate what you see. Snap individual photos of valuable items, furniture, and appliances. Create a written inventory listing each damaged item with approximate age and replacement value. This documentation is your insurance claim foundation. Without it, you’ll struggle to prove what you lost.
Open all windows and exterior doors as soon as you enter to establish ventilation and begin air circulation. Fresh air movement helps dissipate concentrated contamination and begins the drying process.
Your complete preparatory sequence:
-
Remove standing water using a sump pump or wet vacuum, working from the deepest area toward exits and assuming all standing water contains sewage bacteria regardless of how it looks.
-
Clear loose debris by hand-carrying large items, broken objects, and obvious trash to outdoor staging areas, creating clear pathways through each room.
-
Shovel or squeegee heavy mud off floors, pushing it toward exits before it dries into cement-like hardness that requires chipping and scraping.
-
Wipe down surfaces with dry rags or paper towels to remove remaining silt, working from high to low so contamination falls to the floor.
-
Stage salvageable items in a clean outdoor area where you can assess, sort, and clean them without tracking contamination back indoors.
Don’t use fans or create forced air circulation if you can see visible mold growth or smell sewage contamination. Fans spread airborne pathogens and mold spores throughout your home, contaminating areas that were previously clean and creating respiratory hazards in every room. Wait until after disinfection to use fans for drying.
Cleaning Process: Removing Dirt and Contaminants Before Disinfection

Disinfectants only work on clean surfaces. When organic matter, mud, silt, or debris covers contaminated items, disinfectant solutions can’t reach the bacteria and pathogens underneath. The cleaning phase removes physical contamination so disinfection can actually kill what’s left behind. Skip straight to disinfection and you’re wasting time and chemicals while leaving health risks in place.
Hard Surface Cleaning Techniques
Mix phosphate-free detergent with hot water in a bucket. Use scrub brushes on non-porous surfaces like sealed wood furniture, metal cabinets, hard plastic items, and stone countertops. Work in small sections, applying soapy water, scrubbing thoroughly, and rinsing with clean water. For floors and walls, use a mop or large sponge to wash away mud and residue. Change your rinse water frequently so you’re not spreading contamination from one area to another. Solid wood furniture and cabinets benefit from repeated washing to remove contamination from grain patterns and crevices.
Fabric and Clothing Cleaning Methods
Salvageable fabrics go into your washing machine for multiple hot water cycles with detergent. Run contaminated clothing, towels, and washable linens through at least two complete wash cycles at the hottest temperature the fabric can handle. Don’t mix flood-contaminated items with regular laundry. Wash flood items separately until they’ve been through multiple cycles and disinfection. Most upholstered furniture, mattresses, and pillows can’t be adequately cleaned and must be discarded because moisture and contamination penetrate deep into foam and batting.
Large Item and Structural Cleaning
Outdoor items, decks, concrete patios, and exterior siding benefit from power washing to blast away caked mud and debris. Work from top to bottom so contaminated runoff flows downward. Power washers reach into textured surfaces and crevices that hand scrubbing can’t clean effectively. Rinse thoroughly after washing to remove all soap residue before moving to disinfection.
Dispose of contaminated wash water and rinse water by pouring it into toilets connected to municipal sewer systems or into drains that lead to septic systems. Never dump contaminated water onto lawns, gardens, or storm drains that lead to natural waterways. Keep buckets and mops dedicated to flood cleanup separate from tools you use for regular household cleaning to prevent cross-contamination.
Disinfection Protocols and Solutions for Contaminated Surfaces

Cleaning removes visible contamination. Disinfection kills the invisible bacteria, viruses, and pathogens that remain on surfaces after cleaning. You need both steps for safe restoration.
Approved disinfectant types include:
- Chlorine bleach solutions mixed with water at specific ratios for different applications
- Commercial EPA-registered disinfectants designed for flood restoration work
- Hydrogen peroxide solutions at appropriate concentrations for non-bleach applications
- Quaternary ammonium compounds for surfaces where bleach causes damage
| Application Type | Bleach Amount | Water Amount | Contact Time | Use Case |
|---|---|---|---|---|
| Standard disinfection | ½ cup ultra chlorine bleach | 1 gallon water | 5 to 10 minutes | General bacteria removal on hard surfaces, walls, floors |
| Mold remediation | 2 cups household bleach | 2 gallons water | 4 hours minimum | Mold-affected surfaces under 10 square feet |
Apply disinfectant solutions using spray bottles, garden sprayers, or mops depending on surface size. Thoroughly wet the entire contaminated surface so the solution makes complete contact. The contact time determines effectiveness. General disinfection requires 5 to 10 minutes of wet contact time because bacteria die relatively quickly. Mold remediation requires a full 4 hours of contact time because mold structures are more resilient and the bleach needs extended exposure to penetrate and destroy spores. Keep the surface visibly wet during the entire contact period, reapplying solution if it begins to dry. After contact time expires, rinse thoroughly with clean water and allow to air dry. For more information on proper disinfection standards, check the CDC Flood Cleanup Guidelines.
Don’t use chlorine bleach on these surfaces:
- HVAC systems where bleach vapors corrode metal components and contaminate ductwork
- Metals including aluminum, stainless steel, and decorative fixtures where bleach causes pitting and corrosion
- Fine woods with unsealed finishes where bleach strips color and damages grain
- Non-colorfast surfaces including colored fabrics, carpets, and painted items where bleach causes permanent discoloration
- Any area where ammonia-based cleaners were recently used because mixing bleach and ammonia creates toxic gas
Choose alternative disinfectants like hydrogen peroxide or quaternary ammonium compounds for surfaces where you can’t use bleach. Hydrogen peroxide works on metals and colored surfaces without causing damage. Quaternary ammonium disinfectants clean electronics housings and delicate items safely. Always follow manufacturer instructions for dilution ratios, contact times, and safety precautions when using commercial disinfectants.
Material-Specific Cleaning Guide and Item Salvageability Assessment

Porous materials absorb floodwater deep into their structure where cleaning and disinfection can’t reach. Non-porous materials keep contamination on the surface where you can clean and disinfect it away. This fundamental difference determines what you can save and what goes to the curb. Porous items exposed to sewage-contaminated floodwater become permanent health hazards regardless of sentimental or monetary value.
| Material Type | Salvageable | Must Discard | Cleaning Method |
|---|---|---|---|
| Solid wood furniture | Yes | No | Wash with detergent, disinfect, dry slowly |
| Pressboard/particleboard | No | Yes | Cannot be salvaged, discard immediately |
| Metal items | Yes | No | Wash, disinfect with non-bleach solution, dry completely |
| Stone surfaces | Yes | No | Scrub, disinfect, reseal if necessary |
| Hard plastic | Yes | No | Wash with hot soapy water, disinfect thoroughly |
| Carpets | No | Yes | Discard all flood-contaminated carpeting |
| Upholstery | No | Yes | Foam and padding cannot be cleaned |
| Mattresses | No | Yes | Discard immediately, replacement required |
| Electronics | Maybe | Often | Professional assessment only, never plug in |
| Large appliances | Maybe | Sometimes | Professional inspection before use |
| Hardwood flooring | Maybe | Sometimes | Assess for warping, dry slowly, refinish |
| Documents | Maybe | Sometimes | Freeze immediately, professional restoration |
Solid Wood Furniture and Cabinetry
Clean solid wood furniture and cabinets with phosphate-free detergent and water, scrubbing all surfaces including legs, undersides, and interior shelves. Rinse thoroughly and dry slowly in a shaded area with good air circulation. Rapid drying causes warping and cracking. After cleaning, apply appropriate disinfectant to all surfaces. Solid wood often requires refinishing after flood exposure because water raises the grain and damages finishes. Door frames, window frames, floor trimming, and solid wood structural elements follow the same cleaning and disinfection protocol.
Metal, Stone, and Hard Plastic Items
Metal items clean successfully but require non-bleach disinfectants to prevent corrosion. Wash metal furniture, tools, and fixtures with soapy water, dry completely, and apply a light coating of oil to prevent rust formation. Stone countertops and surfaces scrub clean with detergent, accept disinfectant treatment, and may need resealing after drying. Hard plastic objects including storage bins, toys, and household items wash easily in hot soapy water and tolerate bleach disinfection without damage.
Carpets, Rugs, and All Upholstered Items
Discard all flood-contaminated carpets, area rugs, upholstered furniture, mattresses, box springs, pillows, cushions, and fabric window treatments. These porous materials absorb sewage-contaminated water deep into padding, batting, and foam cores where cleaning can’t reach. Bacteria multiply in these hidden wet zones, creating permanent health hazards and persistent odors. The extremely rare exception applies only to items exposed to clean water from supply line breaks that receive immediate professional extraction and treatment within hours. For more information on why porous materials can’t be salvaged due to sewage contamination levels, check Flood Water Contamination Types. Assume all floodwater is contaminated and act accordingly.
Electronics and Large Appliances
Never plug in water-exposed electronics without professional inspection. Water and electricity create electrocution hazards and fire risks. Refrigerators, washing machines, dryers, and dishwashers sometimes survive flooding if motors and electrical components stayed above water levels. Remove power cords, photograph damage, and call appliance repair specialists for assessment before attempting to use them. Computers, televisions, tablets, phones, and devices with internal batteries rarely survive water exposure. Corrosion begins immediately and continues even after drying. Battery-powered items pose fire risks if you attempt charging or powering them on after water exposure.
Hardwood, Tile, and Vinyl Flooring
Inspect hardwood floors for warping, cupping, and separation between boards. Minor water exposure sometimes allows hardwood to be saved if you dry it slowly over several weeks with dehumidifiers running continuously. Rapid drying causes permanent warping. Severely damaged hardwood requires replacement. Tile floors survive flooding when properly dried and disinfected, but grout becomes contaminated and often requires removal and replacement. Vinyl and laminate flooring must be evaluated for water penetration under the surface. If water reached the subfloor, vinyl and laminate require replacement even when surface damage appears minimal.
Kitchen Items, Dishes, and Food
Wash dishes, silverware, pots, and pans in hot soapy water, then run them through your dishwasher on the sanitize cycle or soak them in bleach solution for 10 minutes. Discard all food items touched by floodwater regardless of packaging type. Canned goods, boxed foods, and sealed containers can’t be trusted because floodwater contamination seeps through microscopic gaps and threading. Refrigerators and freezers that lost power during flooding require complete cleanout of all food items. Kitchen cabinets made of solid wood can be cleaned and disinfected. Particleboard cabinets disintegrate after water exposure and must be replaced.
Sentimental items create difficult decisions. Photographs, heirlooms, children’s artwork, and family treasures can’t always be safely restored despite emotional attachment. A baby blanket exposed to sewage-contaminated floodwater becomes a health hazard no matter how much it means to you. Prioritize health and safety over sentiment when contamination levels make restoration impossible or unsafe. Some items can be photographed or documented before disposal, preserving memories if not the physical objects themselves.
Mold Prevention, Remediation, and When to Seek Professional Help

Mold spores exist everywhere, but they need moisture, warmth, organic material, and 24 to 48 hours to begin establishing visible colonies. Speed matters because every hour of delay increases mold growth likelihood. The dangerous myth that only black mold poses health risks ignores the reality that mold comes in all colors including white, green, orange, and brown, and all types cause respiratory problems, allergic reactions, and health complications in vulnerable people.
Prevent mold establishment during cleanup using these techniques:
-
Open windows for cross ventilation immediately upon entry to establish air circulation and begin drying, but avoid using fans if sewage contamination or visible mold is already present.
-
Run dehumidifiers continuously in affected areas to pull moisture from the air and reduce humidity below the 60% level where mold thrives.
-
Remove waterlogged materials immediately including drywall, insulation, carpeting, and absorbent items that can’t dry thoroughly within 48 hours.
-
Monitor moisture levels in remaining materials using moisture meters or by touch, ensuring everything reaches complete dryness.
-
Maintain air circulation with fans only after initial disinfection is complete and sewage contamination has been removed.
-
Check hidden areas including wall cavities, under flooring, and inside cabinets for trapped moisture that creates mold growth zones.
Environmental conditions that accelerate mold growth include:
- Warm temperatures between 60 and 80 degrees where mold colonies grow rapidly
- High humidity above 60% that keeps surfaces damp even when they appear dry
- Organic materials like wood, paper, and fabric that provide nutrition for mold growth
- Poor air circulation that traps moisture in corners, closets, and enclosed spaces
Treating Small Mold Areas Under 10 Square Feet
DIY mold treatment works for contamination under 10 square feet using proper safety precautions and treatment protocols:
-
Put on enhanced protective equipment including an N95 or N100 respirator mask plus a full Tyvek suit that covers your clothing and skin.
-
Mix stronger bleach solution using 2 cups of household bleach per 2 gallons of water in a garden sprayer for better coverage.
-
Thoroughly soak mold-affected surfaces until the solution runs down walls or drips from ceilings, ensuring complete saturation.
-
Leave solution in place for a minimum 4-hour contact time without rinsing or wiping, allowing the bleach to penetrate mold structures and kill spores.
-
Scrub and rinse after contact period using clean water and brushes to remove dead mold material and bleach residue.
The 4-hour contact time is critical because mold structures resist quick-kill disinfectants. Simply drying mold-contaminated surfaces spreads spores throughout your home without getting rid of the problem. The extended bleach exposure breaks down mold at a cellular level and prevents regrowth.
Remove drywall, insulation, and other structural materials when water penetration creates hidden mold risks. Cut drywall one foot above visible watermarks or at drywall seams, whichever is higher, using a utility knife and permanent marker to mark cutting lines. This extra foot accounts for wicking, where water travels upward through porous materials beyond the visible stain line.
The 10 square foot threshold separates DIY treatment from professional remediation requirements. One 10 square foot area equals roughly a 3-foot by 3-foot section of wall or ceiling. Mold contamination exceeding this size indicates widespread moisture problems requiring professional equipment and expertise. Subsurface mold beneath flooring or behind drywall also requires professional treatment because you can’t reach it effectively with surface applications.
People with immune system disorders, COPD, or asthma shouldn’t enter mold-contaminated spaces until professional cleaning is complete and air quality testing confirms safe conditions. Mold spore concentrations in flood-damaged buildings can trigger severe respiratory distress and medical emergencies in vulnerable individuals.
Treating Walls, Ceilings, and Structural Surfaces Contaminated by Floodwater
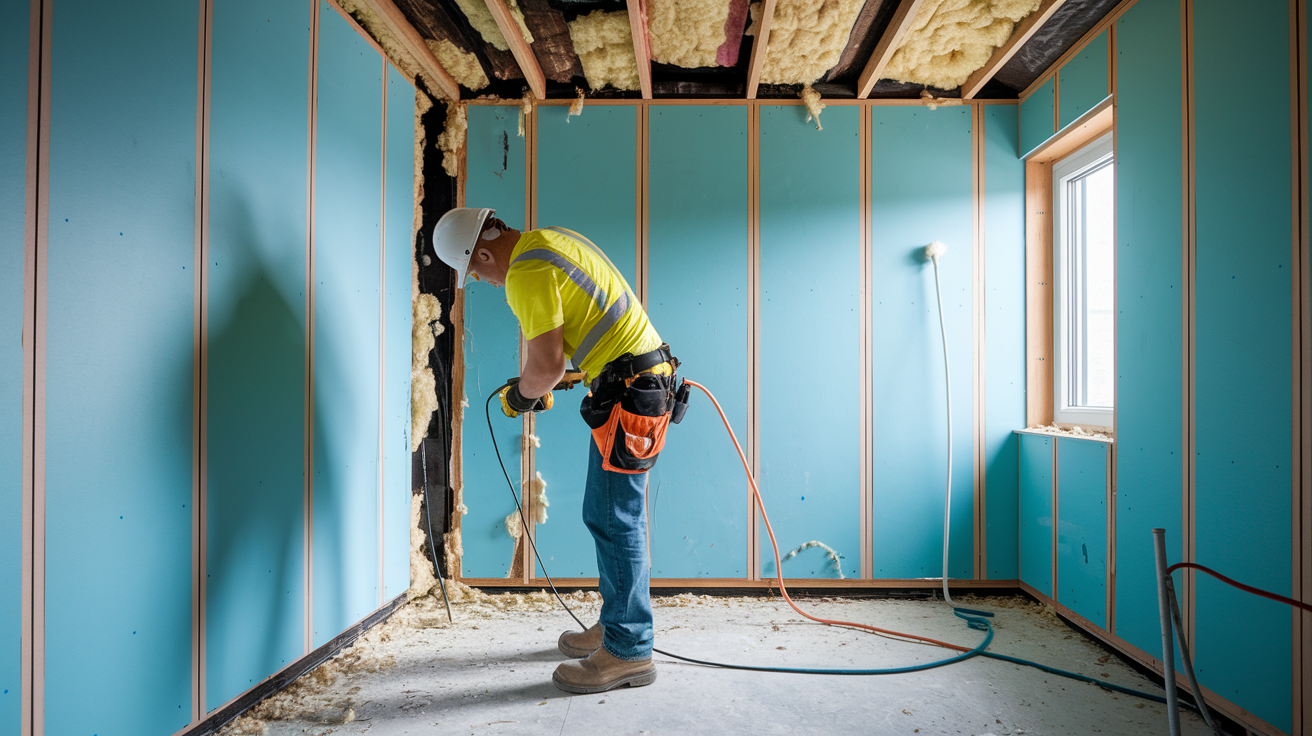
Drywall acts like a sponge, absorbing water through its paper facing and gypsum core. Even after the surface dries, moisture remains trapped inside, creating ideal mold growth conditions. Insulation behind drywall holds water for weeks, losing its insulating properties and growing mold colonies. These hidden moisture zones explain why structural materials typically require removal even when surfaces appear dry.
Remove damaged drywall properly following these steps:
-
Mark cutting lines with a permanent marker one foot above the highest visible watermark on each wall section, or at the nearest drywall seam above the watermark if that’s higher.
-
Score the marked line with a utility knife, cutting through the paper facing on both sides of the drywall.
-
Cut through the drywall completely using a drywall saw or reciprocating saw, working carefully to avoid cutting electrical wires or plumbing inside walls.
-
Remove cut sections by pulling them away from wall studs, exposing the framing and insulation behind.
-
Remove wet insulation immediately and discard it because wet insulation can’t be salvaged and creates ongoing mold growth.
When walls experienced only minor exposure without standing water, cleaning rather than removal sometimes works. Wipe surfaces thoroughly, apply disinfectant solution, and monitor closely for signs of moisture or mold over the following weeks.
Disinfect remaining wall studs and framing after drywall removal using the standard bleach solution. Spray or wipe all exposed wood surfaces, allow proper contact time, and ensure complete drying before installing new drywall. This prevents mold growth on framing that would contaminate new wall surfaces.
Professional assessment becomes necessary when you see sagging ceilings, cracked studs, water-damaged beams, or other signs that structural integrity may be compromised. Load-bearing walls and support structures require engineering evaluation before you remove materials or begin reconstruction.
Document and Paper Item Restoration After Flood Contamination

Paper items degrade rapidly when wet. Hours matter more than days when attempting to salvage important documents, photographs, and irreplaceable papers. Every minute wet paper spends at room temperature increases deterioration, ink bleeding, and bacterial growth that destroys the items permanently.
Take these emergency preservation steps immediately:
-
Separate stuck pages carefully using clean hands, working slowly to prevent tearing, and prioritizing the most important documents first.
-
Rinse contaminated papers briefly under cool clean water if they’re covered in mud or sewage, because contamination causes more damage than brief additional water exposure.
-
Blot excess water using clean towels or paper towels, pressing gently without rubbing to prevent image transfer and surface damage.
-
Freeze papers immediately by placing them in zip-top bags and putting them in your freezer, which stops deterioration and gives you time to arrange professional restoration.
-
Air dry in small batches only if freezer space is unavailable, laying papers flat on clean towels in a cool, dry area with fans providing indirect air circulation.
-
Contact document restoration specialists for items of high value or importance, because professional freeze-drying and treatment saves materials that home methods can’t recover.
Handle photographs with extreme care to prevent image layer separation and color transfer. Rinse briefly in clean water, then lay face-up on clean towels to air dry. Don’t stack wet photos or press them between paper towels because images will transfer and stick permanently.
Prioritize these document types requiring immediate attention:
- Birth certificates, marriage licenses, and death certificates for vital records replacement
- Property deeds and titles proving ownership of real estate and vehicles
- Insurance policies and claim documentation needed for recovery
- Tax records and financial documents required for IRS and business purposes
Acknowledge that heavily contaminated paper items exposed to sewage require disposal despite sentimental value. A wedding album soaked in sewage-contaminated water becomes a health hazard that can’t be safely kept in your home. Photograph the pages before disposal to preserve some memory of the items themselves.
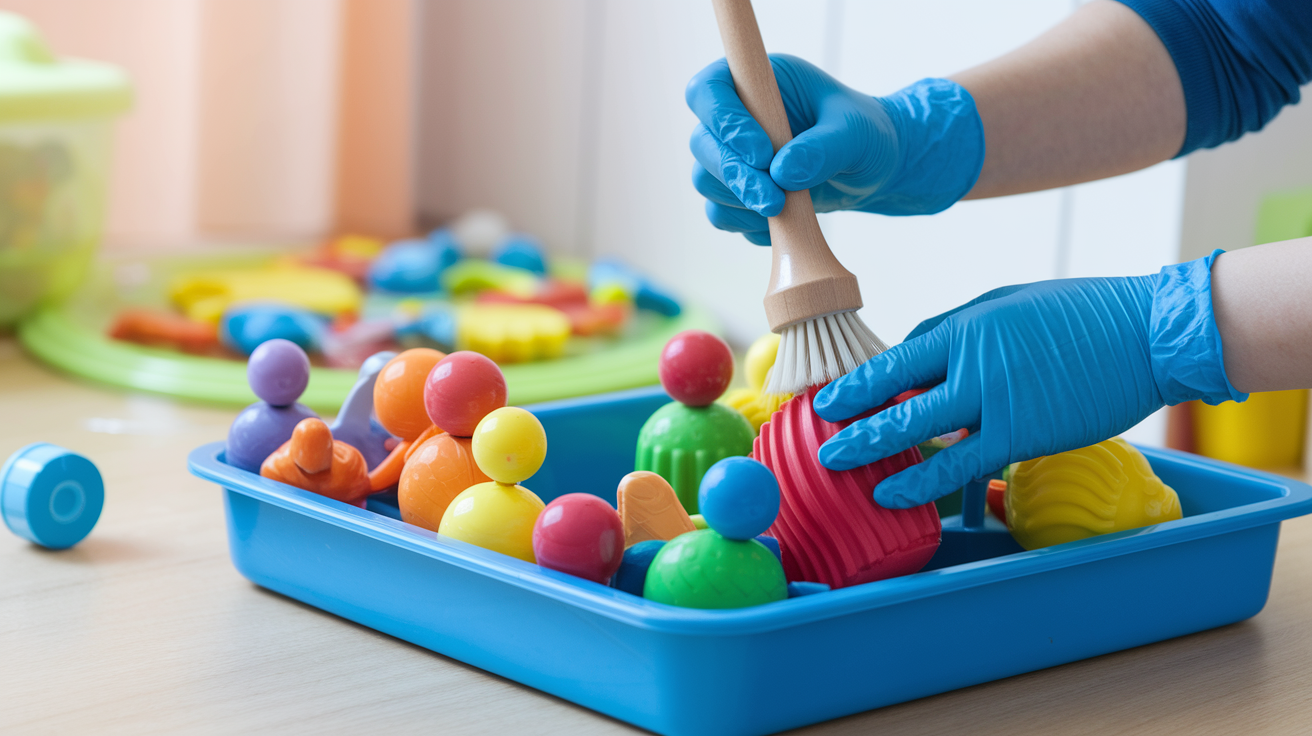
Cleaning Children’s Toys and Baby Items Exposed to Floodwater
Children face heightened contamination risks because they put toys in their mouths, touch surfaces constantly, and have developing immune systems that struggle with pathogen exposure. Safety standards for children’s items must be more stringent than standards for adult belongings.
Salvage and safely clean these toy types:
- Hard plastic toys without electronic components or fabric parts that wash thoroughly with hot soapy water
- Rubber bath toys with no holes or cracks that harbor bacteria in hidden wet zones
- Solid wood toys with sealed finishes that accept scrubbing and disinfection
- Metal toys and vehicles that tolerate complete submersion and bleach disinfection
- Outdoor plastic play equipment that can be power washed and disinfected
Disinfect salvageable toys using the standard bleach solution mixed to ½ cup per gallon of water. Completely submerge toys in the solution for the full 10-minute contact time. Rinse thoroughly with clean water, then air dry completely in sunlight if possible because UV light provides additional disinfection.
Discard these items that can’t be adequately cleaned:
- Stuffed animals and plush toys because fabric and stuffing absorb contamination deep into fibers
- Fabric toys including dolls with cloth bodies and soft blocks that hold moisture and bacteria
- Porous foam toys and bath letters that grow mold inside their cellular structure
- Baby bottles, nipples, sippy cups, and pacifiers exposed to floodwater because microscopic contamination remains in threading and valve mechanisms
Car seats and strollers with fabric components can’t be adequately sanitized after sewage exposure. The padding, harness straps, and fabric covers absorb contamination that cleaning can’t get rid of. Replace these safety items rather than risk your child’s health on questionable restoration attempts.
Managing Basement Cleanup and Below-Grade Contamination Issues
Basement flooding presents higher contamination risks than above-grade flooding because sewage backup commonly occurs in below-grade spaces when municipal systems overflow. Basements also experience longer water exposure because gravity keeps water pooled in low areas. Foundation cracks and floor drain backups introduce contamination directly from sewer systems.
Follow this systematic cleanup sequence for basements:
-
Remove all standing water using sump pumps or professional extraction services, starting from the deepest pooling areas and working toward floor drains.
-
Inspect for structural damage including foundation cracks, bowed walls, shifted support posts, and ceiling damage before proceeding with cleanup.
-
Verify utilities are disconnected and electrical panels are off before touching any basement systems, appliances, or lighting.
-
Remove all contaminated items including furniture, storage boxes, and belongings, carrying them to outdoor staging areas for sorting.
-
Clean all surfaces starting from the ceiling and working down to floors, using detergent and water to remove mud and sewage residue.
-
Disinfect thoroughly using appropriate bleach solutions on all remaining structural surfaces, maintaining proper contact times.
-
Establish continuous drying using commercial dehumidifiers and fans after disinfection is complete, monitoring moisture levels daily.
Assess foundation cracks for structural concerns and water entry points. Cracks wider than hairline thickness or cracks that leak water during rain require professional structural engineer evaluation. Foundation movement during flooding can compromise your home’s structural integrity.
Remove basement finishing materials completely as standard practice rather than attempting salvage. Drywall, drop ceiling tiles, carpeting, and paneling in basements rarely survive flooding because concrete foundation walls wick moisture continuously and below-grade humidity prevents adequate drying. Unfinished basements dry faster and rebuild simpler than finished basements after flooding.
Check sump pump systems for damage and proper function. Install battery backup systems that continue operating during power outages. Consider adding a secondary sump pump for redundancy in high-risk flooding areas.
Odor Removal and Air Quality Restoration in Flood-Damaged Spaces
Persistent odors indicate incomplete disinfection and remaining contamination, not just unpleasant smells you can cover with air fresheners. The smell of sewage, mold, or decay tells you that organic matter and bacterial growth continue actively in your home.
Identify these common persistent odor sources:
- Sewage residue in porous materials, floor drains, or hidden wall cavities that cleaning missed
- Mold growth behind walls, under flooring, or in HVAC systems spreading spores continuously
- Decomposing organic matter including food debris, dead rodents, or plant material trapped in hidden areas
- Contaminated HVAC ductwork that distributes odors throughout your home every time heating or cooling runs
- Trapped moisture in wall cavities and insulation that creates ongoing bacterial growth
Complete thorough cleaning and disinfection first before attempting odor removal. Wash all surfaces with detergent, then apply proper disinfectant solutions with correct contact times. Remove source materials including contaminated drywall, insulation, and flooring rather than attempting to mask odors they produce. Only after contamination is physically removed and surfaces are disinfected should you move to ventilation and dehumidification.
Don’t use air fresheners, scented candles, or ozone generators before completing proper disinfection. These products mask smells temporarily without addressing the contamination causing the odors. Ozone generators pose respiratory risks and should only be used in unoccupied spaces by trained professionals.
Restore air quality using these steps:
- Clean HVAC ductwork professionally to remove dust, mold spores, and contamination distributed during flooding
- Replace all air filters in heating and cooling systems with fresh high-quality filters
- Continue dehumidification until humidity levels drop below 50% and remain stable
- Test air quality with professional sampling if odors persist after complete cleaning and disinfection
Understanding Water Categories and Contamination Severity Levels
Water damage professionals use a three-category classification system that determines appropriate cleanup methods and safety requirements. Understanding these categories helps you assess whether DIY cleanup is appropriate or professional services are required.
| Category | Source | Contamination Level | DIY Appropriate |
|---|---|---|---|
| Category 1 – Clean Water | Supply lines, faucets, rainfall, melting snow | No sewage or chemical contamination at source | Yes, if addressed within 24 to 48 hours |
| Category 2 – Gray Water | Washing machines, dishwashers, sump pumps, clean toilet overflow | Moderate contamination from soaps, detergents, food particles | Sometimes, with proper safety equipment |
| Category 3 – Black Water | Sewage, river flooding, standing water, toilet backup, storm surge | Severe contamination with bacteria, pathogens, chemicals, waste | No, professional restoration required |
Category 1 clean water from broken supply lines or rainfall can be addressed with DIY methods if you act within 24 to 48 hours. Clean water has no sewage or chemical contamination at the source. Proper extraction, drying, and disinfection restore items safely when work begins immediately.
Category 2 gray water carries moderate contamination from washing machine discharge, dishwasher overflow, or clean toilet tank overflow. Gray water contains soaps, detergents, food particles, and mild bacteria but no sewage. DIY cleanup is possible with proper protective equipment and thorough disinfection, though professional help reduces health risks.
Category 3 black water comes from
Final Words
Cleaning contaminated items after flood exposure is a systematic process that depends on quick action, proper protective equipment, and understanding what you can salvage versus what must go.
Start by documenting everything for your insurance claim, then suit up with the right safety gear before you touch a single item.
Sort your belongings by material type, remove all debris and mud first, then clean with detergent before you disinfect. That sequence matters.
Hard surfaces like solid wood, metal, and stone can typically be saved. Porous materials like carpets, upholstered furniture, and particle board need to be discarded.
When you’re dealing with mold over 10 square feet, sewage contamination, or structural concerns, call a professional. Some situations aren’t safe for DIY work.
The 24 to 48 hour window is real. Move fast, follow the steps, and you’ll protect your family’s health while recovering what you can.
FAQ
How to sanitize after a flood in your house?
To sanitize after a flood in your house, start by cleaning all surfaces with phosphate-free detergent and water to remove dirt and mud, then apply a bleach solution (half cup bleach per gallon of water) and let it sit for 5 to 10 minutes before rinsing.
How quickly does mold grow after a flood?
Mold grows quickly after a flood, typically establishing within 24 to 48 hours of water exposure, which is why starting cleanup immediately is critical to prevent mold from taking hold in your home.
What kills bacteria from sewage?
Bleach solution kills bacteria from sewage when you mix half cup of bleach with one gallon of water, apply it to contaminated surfaces, and let it sit for 5 to 10 minutes before rinsing with clean water.
Can I wash my clothes after a flood?
You can wash clothes after a flood if they are salvageable non-porous fabrics by running them through multiple hot water wash cycles with detergent, but you must discard all porous absorbent materials like upholstered items and heavily soiled fabrics.