
You can replace a waterlogged photo, but you can’t replace your grandmother’s face in the only picture that survived her youth. Most homeowners keep thousands of irreplaceable memories in basements and ground floor rooms where flooding hits first and hits hard. Moving your photo collection to safer storage takes less than an afternoon, and the simple methods in this guide work in apartments, small houses, and tight budgets without specialized equipment or expensive solutions.
Immediate Protection Methods for Your Photo Collection

-
Sealed plastic bags – Slip individual photos and small stacks into ziplock freezer bags, pressing out air before sealing. One homeowner keeps her grandmother’s wedding photos in gallon bags inside the linen closet, two floors up from ground level.
-
Airtight plastic containers – Replace every cardboard box holding photos with hard plastic bins that seal completely. Look for containers with gasket seals along the lid.
-
Waterproof safes – Store your most valuable photos in a waterproof document safe rated for submersion. These bolt to the floor and protect against both water and fire.
-
Vacuum sealed bags – Use a vacuum sealer to remove all air from bags containing photo collections. This creates the tightest water barrier available for home storage.
-
Elevated storage on upper floors – Move all photo containers to second floor closets or higher. In flood-prone areas, store them on the top shelf, not the floor.
-
Temperature controlled rooms above ground level – Keep photos in climate controlled living spaces like bedrooms and hallway closets. Skip the basement entirely.
-
Waterproof pouches for emergency kits – Pack a selection of irreplaceable photos in a waterproof pouch you can grab in under 30 seconds during evacuation.
Family memories and heirloom photos carry irreplaceable sentimental value that no insurance payment can restore. Wedding photos, baby pictures, images of relatives who’ve passed, and documentation of your children’s childhood exist nowhere else.
The safest approach combines multiple protection layers working together. Physical barriers like sealed bags stop water from reaching photos. Smart placement on upper floors puts distance between your collection and rising floodwater. Backup systems through digitization mean even total physical loss doesn’t erase the memories. Each layer you add reduces the chance that one failure point destroys everything.
Basements put your photos in the most dangerous location in any home. Flooding enters through foundation cracks, sewer backups, and ground level windows. Broken pipes from washing machines and water heaters dump gallons directly onto whatever sits on basement floors. Humidity and temperature swings in basements also cause long term damage even without floods, warping photos and encouraging mold growth before disaster ever strikes.
Complete Digital Backup Strategy and Cloud Storage

Digital copies protect against total loss and allow remote access during evacuations. When floodwater’s rising and you’ve got minutes to leave, you can’t risk your life retrieving photo albums or external hard drives. Digital files stored in the cloud travel with you anywhere you can access the internet from a phone or computer, even if your entire house floods.
The three location backup rule provides ideal security for digital photo collections. Store your scanned photos in three separate places using different storage types, like an external hard drive at home, cloud storage accessible anywhere, and a flash drive kept in a fireproof safe or at a relative’s house in a different city. If one location fails during a disaster, you still have two complete copies.
Scanning and Digitization Methods for All Photo Types
Start with the photos you absolutely can’t lose. The ones that would devastate you if they disappeared. Wedding photos, pictures of deceased family members, your kids’ baby photos, and images from irreplaceable moments deserve scanning first.
Home flatbed scanners handle standard prints reasonably well. Place photos face down on the glass, scan at 600 DPI for long term preservation quality, and save files with descriptive names like “Mom-graduation-1985.jpg” instead of “IMG_001.jpg.”
Free mobile phone scanner apps work surprisingly well for getting started without buying equipment. PhotoScan for iPhone and Google PhotoScan for Android use your phone camera to capture prints while reducing glare. Hold your phone steady above each photo, follow the on-screen guide, and the app creates a digital file you can immediately upload to cloud storage.
High speed scanners process stacks of photos much faster than flatbed models, feeding multiple photos through automatically. These make sense if you’re digitizing hundreds or thousands of images.
Professional scanning services handle negatives, slides, oversized scrapbooks, VHS tapes, and old film reels that require specialized equipment you probably don’t own. Mail your collection to companies that scan everything and return digital files on a USB drive along with your originals. This costs money but saves the huge time investment of learning specialized scanning techniques.
Scan photos in batches while watching TV or during quiet evenings, dedicating 30 minutes daily for a week to make real progress on projects that feel overwhelming when you look at the full scope.
Cloud Storage Platforms and Features
Google Photos offers free storage for compressed photos and paid plans for full resolution files. It automatically organizes images by date and recognizes faces to group family members together.
iCloud integrates seamlessly with iPhones, automatically backing up every photo you take. Five gigabytes comes free with Apple devices, with paid upgrades available for larger collections.
Dropbox provides automatic camera upload from phones, immediately copying new photos to cloud storage as you take them. Free accounts include limited storage, with reasonably priced paid options.
Google Drive and OneDrive offer similar features with file storage that works for photos alongside documents. Both include free storage tiers and connect to phone apps for automatic syncing.
Backblaze creates automatic cloud backups of your entire computer and any attached external drives for one flat annual fee. It runs in the background, continuously backing up new files without you thinking about it.
Enable automatic syncing in your chosen platform’s phone app so every photo backs up without manual uploads. This happens over WiFi while your phone charges overnight.
Physical Digital Storage Solutions
External hard drives store thousands of high resolution photos in a device smaller than a paperback book. Buy drives rated for 1TB or more, copy your entire photo library, and store the drive in a waterproof container on an upper floor. Update it monthly by connecting to your computer and copying new photos.
USB flash drives fit inside fireproof document bags and safety deposit boxes. A 128GB flash drive holds thousands of photos and costs less than dinner out. Keep one updated copy in a flash drive at your parents’ or sibling’s house in a different city.
Enable automatic syncing from phones and cameras to prevent losing photos that never made it off the device. If your phone falls in floodwater before you backed up last month’s pictures, those memories disappear unless automatic cloud backup was running.
Three separate locations ensure photos survive even if one location fails completely. House fire, devastating flood, or tornado damage that destroys your entire home still leaves two complete backup copies safe. Off site storage and cloud platforms protect against natural disasters affecting your whole neighborhood. Digital files remain accessible remotely during evacuations without risking your life to retrieve physical items from a flooding home.
Creating an Emergency Photo Evacuation Kit
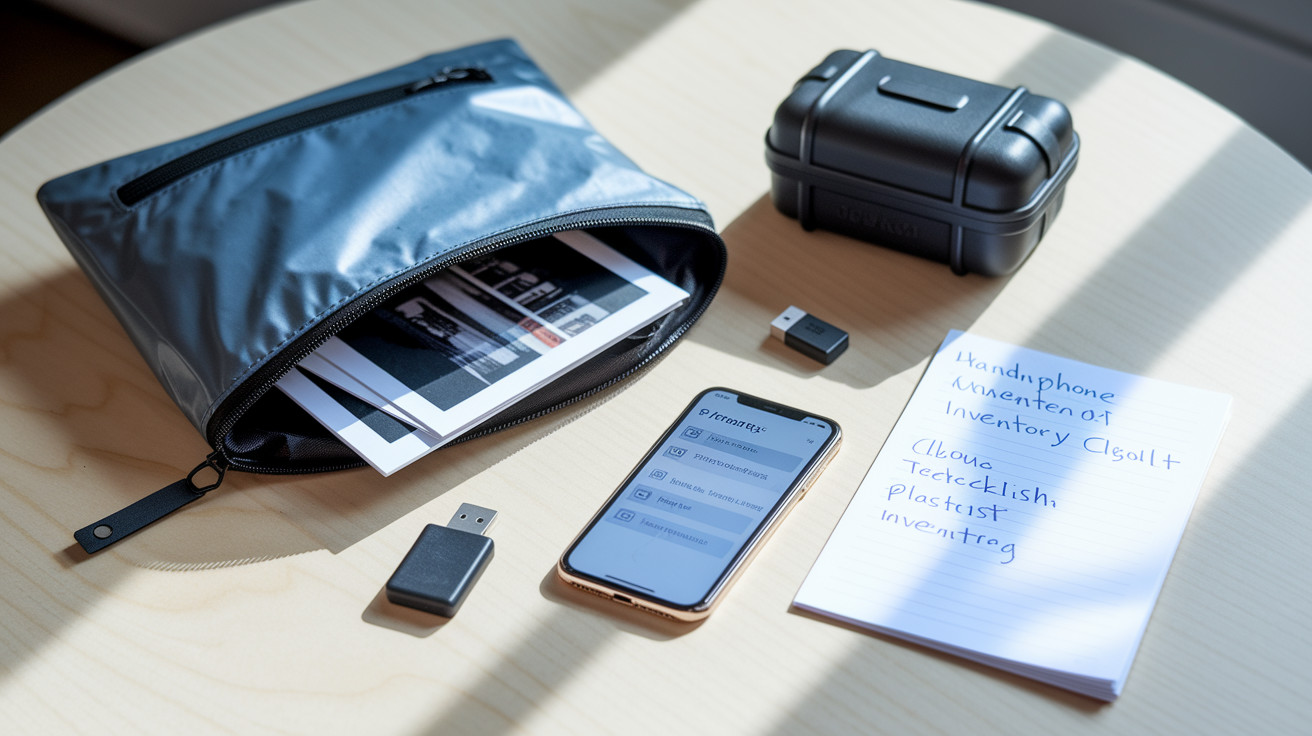
Evacuation orders provide limited time windows, sometimes just hours or even minutes to gather essentials and leave. Stress and panic mess with your ability to decide what photographs matter most when you’re rushing to pack vehicles and secure pets while water rises outside.
Pre-planning during calm moments prevents leaving behind items with irreplaceable sentimental value. Identify the 20 or 30 physical photos you’d grab if you could only save a handful, like your parents’ wedding portrait, your children’s baby pictures, or the last photo taken with someone who’s passed. Pull these from albums and frames now, not when evacuation orders arrive.
Your grab and go kit should fit in one portable waterproof container that lives in an accessible location like a bedroom closet:
Selection of priority physical photos – The 20 to 30 irreplaceable images identified during calm planning
USB flash drives with complete digital backup – Recent copy of your entire scanned photo collection
Phone note listing photo locations – Quick reference showing where albums and photo boxes are stored in the home
Waterproof zipper bag or hard case – Container protecting contents from water exposure during transport
Cloud backup verification checklist – Reminder to confirm cloud storage uploaded recent additions before leaving
Store this kit in your bedroom closet or another upper floor location you pass naturally when gathering evacuation essentials. Keeping it with other emergency supplies like important documents and medication lists creates one stop preparation.
Photo Album and Framed Picture Protection Methods

Photo albums concentrate dozens or hundreds of photos in one vulnerable package that becomes extremely heavy when waterlogged. A single flooded album can destroy an entire decade of family memories.
Before storm warnings arrive, scan all album pages using a phone scanner app so digital copies exist even if physical albums get damaged. Then wrap albums in multiple layers of plastic, sealing each layer with packing tape to create overlapping barriers against water intrusion. Store wrapped albums on the highest shelf in an upstairs closet, never on the floor where rising water reaches first.
Album and frame protection steps:
Wrap albums in sealed plastic layers – Use garbage bags or plastic sheeting, taping each layer closed before adding the next barrier
Scan album pages before storms threaten – Photograph or scan each page to preserve the full layout and memories
Remove most valuable photos from frames – Take irreplaceable images out of frames and add to your evacuation kit
Use archival quality protective sleeves – Store loose photos in acid free sleeves that won’t cause yellowing or degradation
Document all framed photos on walls – Take phone pictures of framed images for insurance claims if they’re damaged
Framed photos hanging on walls survive better than items stored at floor level, providing passive flood protection through elevation. Wall mounted frames stay dry longer as water rises, buying time if you need to return and retrieve items before water reaches higher.
Balancing display versus protection means keeping favorite photos visible in frames while maintaining scanned digital copies and storing the absolute most valuable originals in sealed containers upstairs. You can reprint and reframe digital copies, but original prints from decades ago can’t be replaced.
Flood Recovery: Salvaging Water Damaged Photos
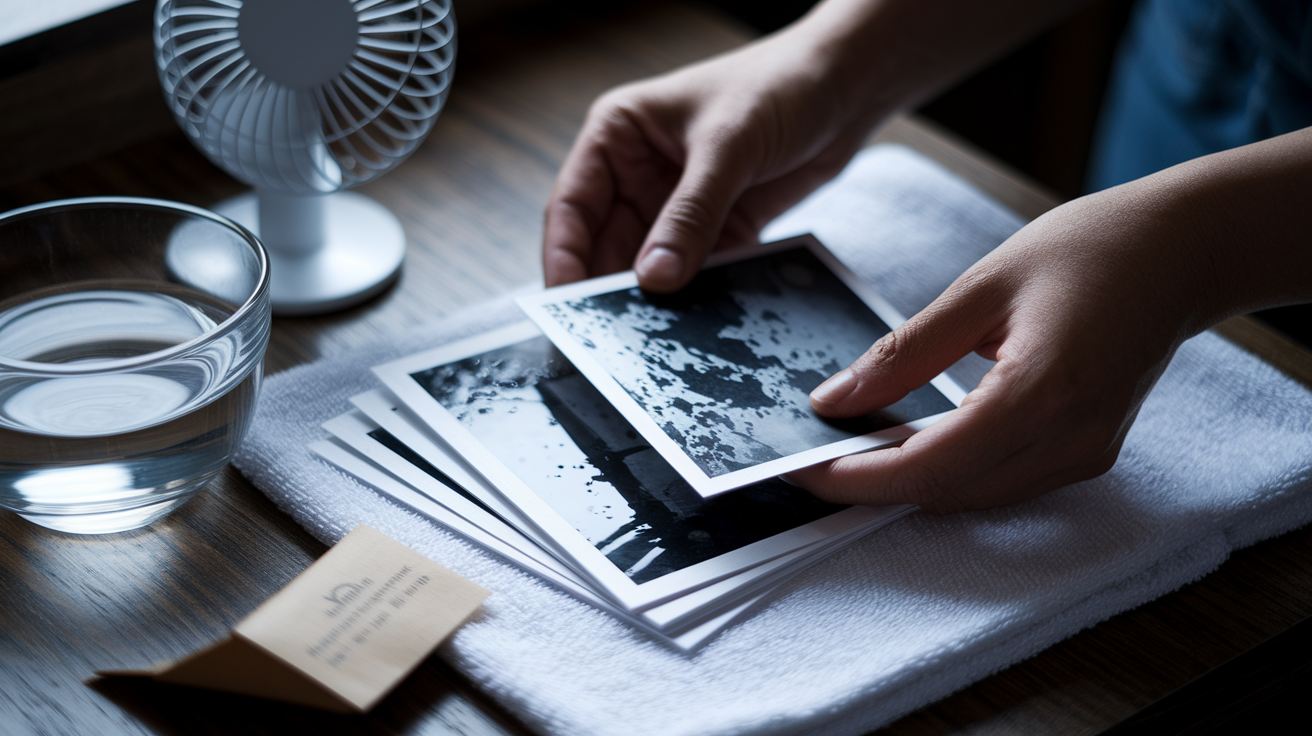
Act within hours after water intrusion to maximize photo recovery chances. Mold begins growing on wet photos within 24 to 48 hours, permanently staining and destroying images.
Assess damage severity by examining how long photos were submerged and what type of water contacted them. Clean rainwater causes less damage than contaminated floodwater containing sewage or chemicals.
Emergency photo recovery steps:
- Gently separate stuck photos – Carefully peel apart photos stuck together while wet, working slowly to avoid tearing softened paper
- Remove visible debris – Rinse mud, dirt, and contamination under gentle running water or in a clean water bath
- Rinse with clean water if contaminated – Gently wash photos exposed to sewage or chemical floodwater to remove harmful residue
- Lay flat for air drying – Place photos face up on clean towels, never stacking wet photos which stick together permanently
- Use fans for air circulation – Set up fans to move air across drying photos without blowing directly on them
- Scan damaged photos immediately – Digitize photos as soon as they’re dry enough to handle, capturing the image before further degradation
- Contact restoration services for valuable items – Professional photo restoration can repair damage to heirloom images worth the service cost
| Damage Level | DIY Recovery | Professional Help Needed |
|---|---|---|
| Minor water exposure, brief contact, clean water | Air dry flat, scan immediately, store in archival sleeves | Not typically needed unless photos show value worth restoration investment |
| Moderate soaking, submerged hours, some sticking | Gentle separation, rinse if needed, air dry with fans, scan all salvaged photos | Consider professionals for irreplaceable heirlooms showing warping or color bleeding |
| Severe damage, contaminated water, prolonged submersion, visible mold | Rinse contamination, carefully separate what’s possible, scan immediately | Professional restoration services for any photos you want to save. Severe damage requires specialized techniques |
Prevention remains far easier and more effective than recovery. Even successful salvage operations leave photos with visible water damage, warping, and color degradation. Waterproof storage, elevation, and digital backups created before flooding prevent the heartbreak of attempting to rescue deteriorated memories.
Organizing Photos for Faster Flood Protection

Chaos slows emergency response when you’re scrambling to remember where different photo collections are stored across attics, closets, basements, and spare bedrooms. Those extra minutes spent searching could mean the difference between saving photos and watching them flood.
Centralized photo storage in designated upper floor locations puts all your physical photos in flood safe zones you can access quickly. Gathering scattered photos during calm periods happens at your own pace, unlike evacuation scenarios where every minute counts.
Organization steps that improve flood response:
- Gather all physical photos to central location – Collect photos from every room, drawer, and storage area into one sorting workspace
- Remove duplicates and poor quality images – Eliminate blurry shots, duplicate prints, and photos of strangers to reduce what needs protection
- Tier photos by importance – Sort into irreplaceable (wedding, deceased relatives), valuable (vacation memories, children’s milestones), and replaceable (reprints available, duplicates kept elsewhere)
- Create inventory list with descriptions – Note what’s in each container, like “Mom’s childhood photos 1960 to 1975” so you know what you’re protecting
- Document storage locations – Make a phone note listing where each category is stored, like “Wedding album, master bedroom closet top shelf”
Knowing exactly what photos you own and where they’re located speeds up evacuation decisions dramatically. Instead of wandering through the house trying to remember where you put things, you check your phone note, grab the pre-identified priority containers, and leave.
Maintaining organization through regular reviews, maybe twice a year, keeps the system working. Add new photos to appropriate containers, update your inventory list when you scan batches, and verify your grab and go kit still contains the most current irreplaceable selections. Organization happens during calm periods, not when floodwater’s rising and evacuation orders are blaring from your phone.
Weather Monitoring and Flood Preparedness for Photo Safety
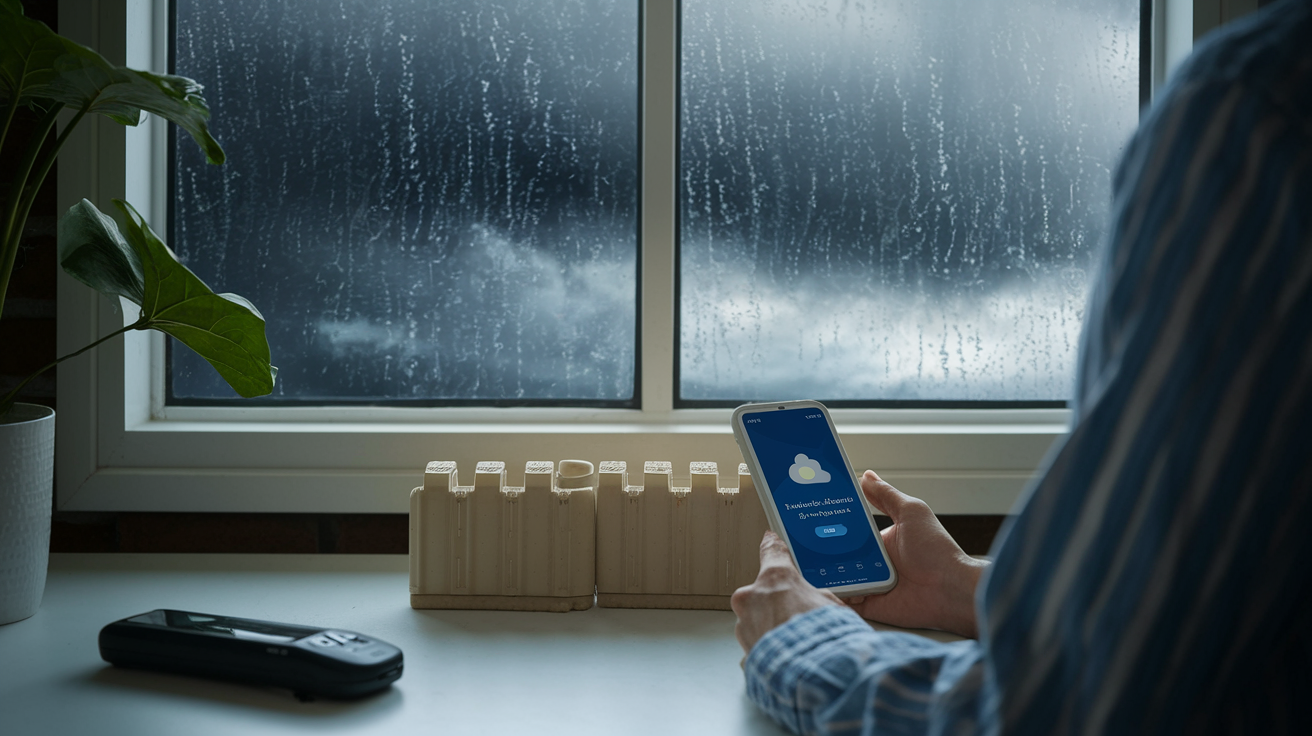
Weather alerts provide limited response windows that shrink fast as storms develop. Tropical systems might give 72 hours warning, but flash flood conditions from heavy rain can develop in hours.
Last minute scrambling to protect photos rarely works well. Scanning equipment may be packed away. Waterproof containers might be in the garage, already threatened by rising water. Family members panic and forget where important items are stored.
Advance preparation actions:
Verify home location relative to flood zones – Check FEMA flood maps to understand if you’re in high risk, moderate risk, or low risk zones
Enable weather alerts for heavy rain and flooding – Set phone notifications for flash flood watches, warnings, and tropical weather threatening your area
Create photo protection timeline – Write specific actions for 72 hour, 48 hour, and 24 hour warnings, like “72hr: scan priority photos, 48hr: seal albums in plastic, 24hr: move containers upstairs, 12hr: pack evacuation kit”
Pre-position waterproof containers and scanning equipment – Keep supplies accessible and ready to use, not buried in storage
Practice grab and go procedures with household – Walk through evacuation kit location and photo priority decisions with family members so everyone knows the plan
Hurricane preparedness includes photo protection as a standard checklist item, not an afterthought while boarding windows. Coastal residents familiar with tropical weather know to digitize and secure photos well before evacuation orders arrive. If you live in flood zones near rivers, low lying areas, or regions with heavy rain seasons, approach photo protection with the same systematic planning.
Knowing your flood risk informs how much preparation intensity makes sense. High risk flood zones justify more aggressive measures like permanent elevated storage, regular scanning schedules, and maintained cloud backups. Lower risk areas still benefit from basic waterproof containers and knowing where photos are located, even if elaborate systems seem unnecessary. Advance preparation reduces stress dramatically and improves outcomes because you’re working from a plan instead of making panicked decisions while water rises outside your windows.
Home Infrastructure Upgrades That Protect Photos

Whole home flood protection systems benefit all your possessions, including photo collections stored throughout the house. Preventing water intrusion at the source stops damage before it reaches storage areas.
Early warning systems provide time to take protective action before water damages photos. Water leak sensors placed near washing machines, water heaters, and sump pumps alert you to problems while they’re small and manageable, not after they’ve flooded the room.
| Infrastructure Upgrade | Photo Protection Benefit | Typical Cost Range |
|---|---|---|
| Water leak sensors with smartphone alerts | Early warning before small leaks become major flooding, allowing time to move photos to safety | $50 to $300 for multi-sensor systems |
| Battery backup sump pump systems | Prevents basement flooding during power outages when primary pump fails, protecting ground level storage | $400 to $1,200 installed |
| Improved yard drainage and grading | Redirects water away from foundation, reducing intrusion risk to photo storage areas | $500 to $3,000 depending on scope |
| Temporary flood barriers and sandbags | Blocks water entry at doors and vulnerable points, buying time to secure photos during flooding events | $100 to $500 for reusable barriers |
| Regular pipe inspection and maintenance | Prevents broken pipe flooding that threatens photo collections stored near plumbing | $150 to $400 for professional inspection |
Prioritize upgrades based on your home’s specific water intrusion vulnerabilities and where you currently store photos. Basement flooding prevention delivers the highest impact if you’re still storing photos below ground level, though moving them upstairs provides faster and cheaper protection. Homes in flood prone areas benefit most from comprehensive approaches combining drainage improvements, backup sump systems, and temporary barriers deployed when storms threaten. Some flood mitigation upgrades qualify for insurance discounts that partially offset installation costs over time.
Final Words
Your photos deserve better than cardboard boxes on the basement floor.
Protecting your collection means layering physical barriers, smart placement, and digital backups so one method catches what another might miss. Start with sealed bags and elevated storage today, then tackle scanning and cloud backups as you have time.
You don’t need to finish everything this weekend. Pick one step from how to protect photos from flooding and do it now. Move your most precious prints to higher ground. Start a cloud backup. Build your grab-and-go kit.
Those family memories are worth 30 minutes of effort.
FAQ
How do you save photos after a flood?
To save photos after a flood, you should gently separate stuck prints, rinse them with clean water to remove debris, lay them flat to air dry without stacking, and scan them immediately before mold develops.
How do you waterproof a photo?
You waterproof a photo by placing it inside a sealed plastic bag, storing it in an airtight container, or using vacuum sealed bags for maximum protection against water damage and flooding.
What can you spray on photos to protect them?
You should not spray anything directly on photos to protect them, as chemicals can damage prints. Instead, place photos in sealed plastic bags or waterproof containers to keep water away from the images.
Is it better to store photos in plastic or cardboard?
It is better to store photos in plastic containers or sealed plastic bags rather than cardboard boxes, because cardboard absorbs water during floods and provides no protection against water damage.
What are the best waterproof containers for storing photos?
The best waterproof containers for storing photos include airtight plastic bins, waterproof safes for valuable items, sealed plastic bags for individual photos, and vacuum sealed bags for maximum water protection during floods.
How do you protect photo albums from flood damage?
You protect photo albums from flood damage by wrapping them in multiple sealed plastic bags, storing them on upper floors or high shelving, and scanning all album pages to create digital backups.
Should you remove photos from frames before a flood?
You should remove your most valuable photos from frames before a flood and store them separately in waterproof containers, as framed photos are bulky and harder to protect quickly during evacuations.
Where should you not store photos in your home?
You should not store photos in basements, attics, or garages because these areas face extreme temperatures, high humidity, basement flooding, and broken pipes that threaten collections with water damage.
What is the three location backup rule for photos?
The three location backup rule for photos means storing digital copies in three separate places, such as an external hard drive, cloud storage, and a flash drive in a fireproof safe or off-site location.
What cloud storage services protect photos from floods?
Cloud storage services that protect photos from floods include Google Photos, iCloud, Dropbox, Google Drive, OneDrive, and Backblaze, which offer automatic backup features and remote access during evacuations.
How do you scan photos without a scanner?
You scan photos without a scanner by using free mobile phone scanner apps available for iPhone and Android devices, which let you digitize your most important photos quickly and effectively.
Should you hire professional photo scanning services?
You should hire professional photo scanning services for negatives, slides, oversized scrapbooks, VHS tapes, and film reels that require specialized equipment beyond what home scanners or phone apps can handle.
What goes in an emergency photo evacuation kit?
An emergency photo evacuation kit should include your most irreplaceable physical photos, USB drives with digital backups, a phone inventory list of photo locations, and a waterproof container for quick access.
Where should you store your emergency photo kit?
You should store your emergency photo kit on an upper floor near your main exit route in a waterproof bag or container, making it easy to grab during evacuations without searching.
How do you dry water damaged photos?
You dry water damaged photos by gently separating stuck prints, rinsing off visible debris with clean water, laying them flat without stacking, using fans for air circulation, and scanning them immediately.
When should you contact professional photo restoration services?
You should contact professional photo restoration services when photos suffer severe water damage with contamination, when family heirlooms require expert care, or when DIY drying methods produce poor results.
How long does it take to organize photos for flood protection?
It takes about 30 minutes daily for one week to make significant progress organizing photos for flood protection by consolidating scattered collections, removing duplicates, and creating priority tiers.
How do you create a photo inventory list?
You create a photo inventory list by documenting descriptions of your most important photos, organizing them by importance tiers, noting their current storage locations, and saving this information in a phone note.
What home upgrades protect photos from flooding?
Home upgrades that protect photos from flooding include water leak sensors for early warning, sump pump systems, improved drainage, temporary flood barriers, and regular pipe inspection to prevent water intrusion.
Should you store digital photo backups off-site?
You should store digital photo backups off-site in safety deposit boxes, at relatives’ homes in different geographic areas, or in cloud storage to ensure photos survive disasters that destroy entire homes.