
Most families think they’ll have hours to evacuate when flooding starts, but disabled family members actually need to leave 2 to 4 hours before everyone else. Wheelchairs lose traction in just 3 inches of moving water. Powered medical equipment fails when wet. Accessible shelters fill up fast, and the good spaces go first. If you wait for a flood warning, you’ve already waited too long. This guide walks you through evacuating a disabled family member step by step, covering mobility impairments, sensory disabilities, cognitive challenges, and equipment protection so you can get out safely before roads become impassable.
Immediate Action Steps: Evacuating Your Disabled Family Member During a Flood
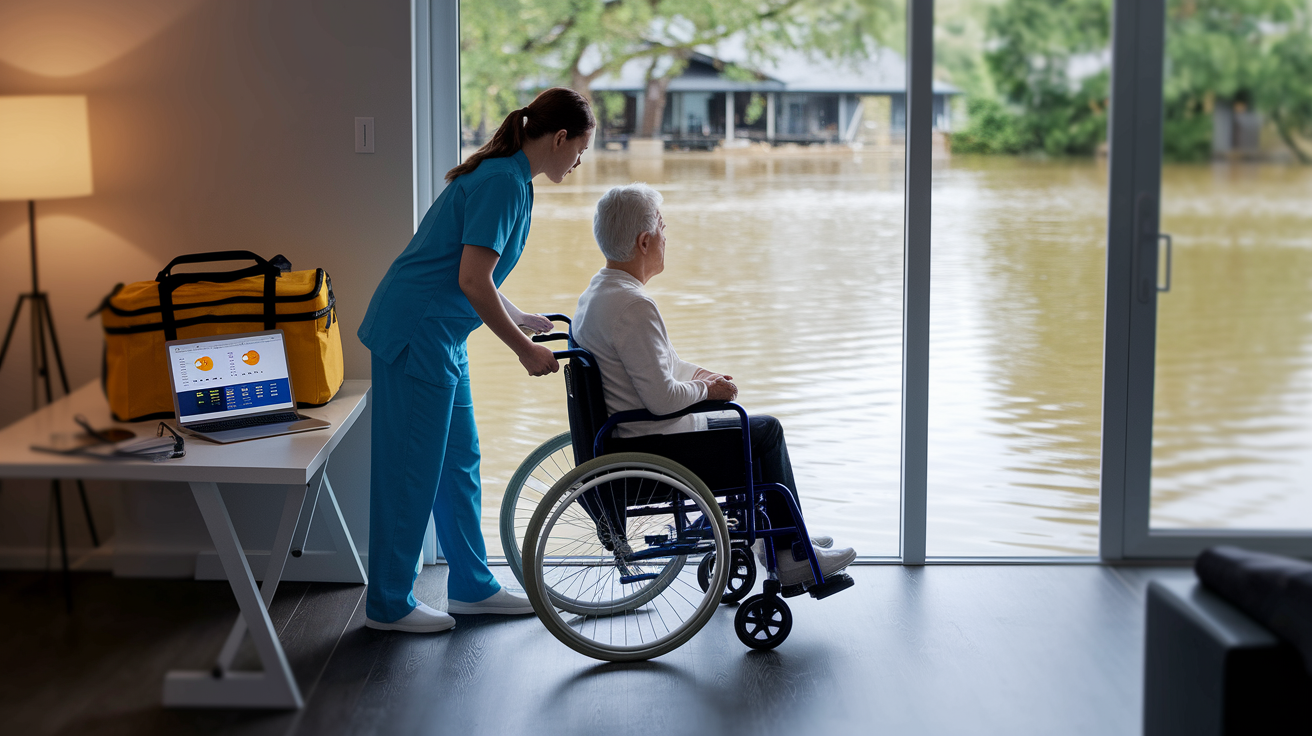
People with disabilities need more time and support to get out during floods. When a flood watch gets issued (meaning flooding’s possible), start preparing to leave right now. Don’t wait for a flood warning, which means flooding’s already happening or about to start. Disabled family members should evacuate at least 2 to 4 hours before everyone else to account for mobility challenges, medical equipment setup, and accessible transportation timing.
Evacuating Family Members with Mobility Impairments
Monitor weather alerts continuously and decide to leave during a flood watch, not a flood warning. Mobility equipment requires extra prep time and accessible routes can become impassable fast.
Notify all emergency contacts of your departure time, destination, and expected arrival. Someone outside the flood zone needs to know your status and can alert authorities if you don’t show up.
Gather wheelchairs, walkers, canes, and all mobility equipment. Secure them properly in the vehicle with tie-downs or straps so they don’t shift during transport.
Collect all medical equipment, backup power supplies, extra batteries, and charging cables. Pack them in waterproof bags or containers.
Choose accessible evacuation routes that you verified in advance. Avoid roads with steep grades, narrow passages, or areas known to flood first.
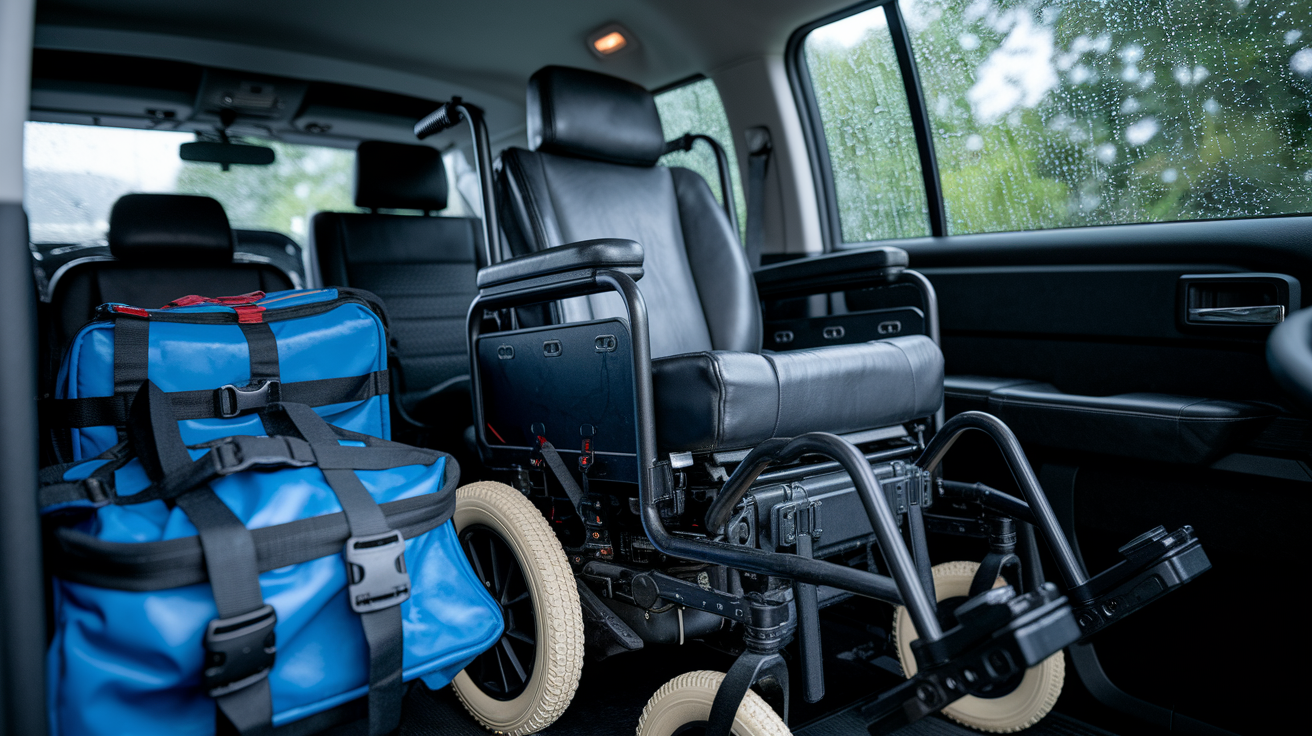
Use pre-arranged accessible transportation with ramps or lifts rather than attempting transfers into standard vehicles during evacuation chaos.
Confirm your destination shelter is ADA-compliant with accessible bathrooms, sleeping areas, and power outlets before leaving. Discovering problems after a 3-hour drive creates dangerous situations.
Plan to arrive at the shelter early while staff energy is high and accessible spaces are still available. Not after dark when resources are depleted.
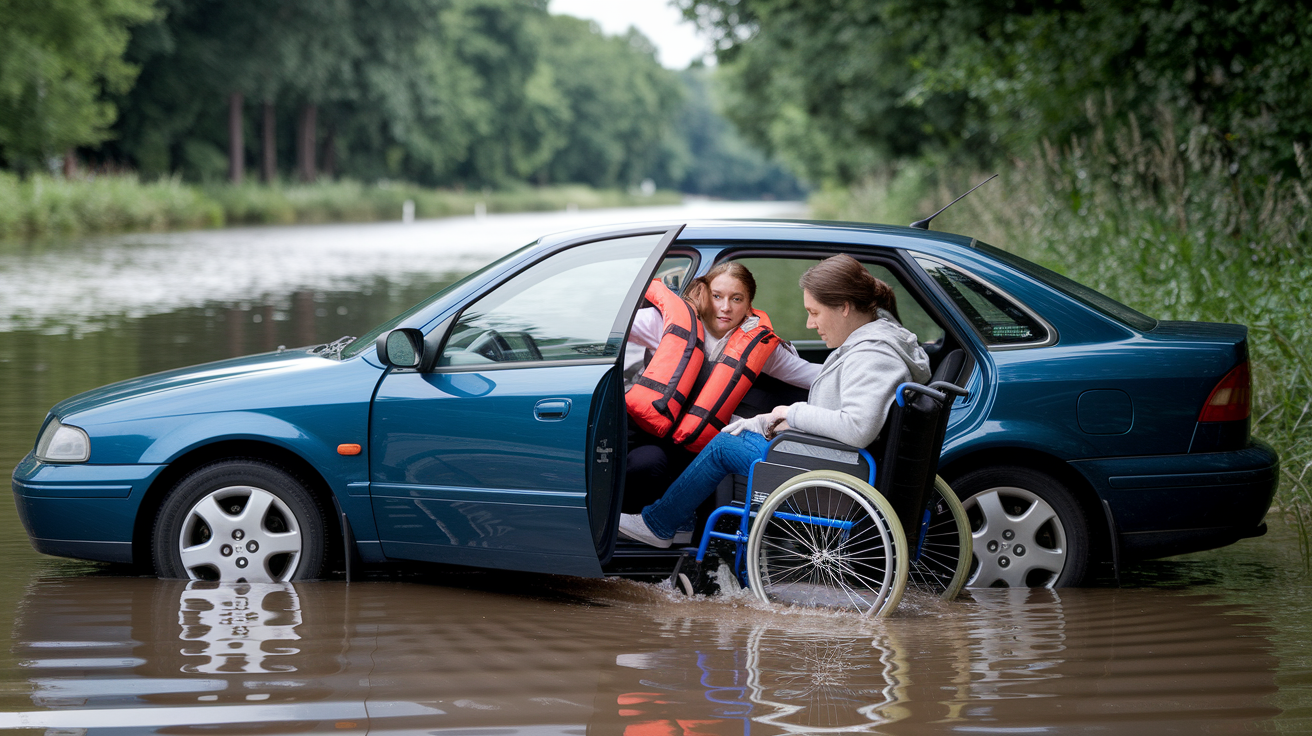
Never push or navigate a wheelchair through moving water deeper than 3 inches. Wheels lose grip and the chair can float away. Caregivers shouldn’t move through water deeper than 6 inches to avoid being swept off their feet.
Evacuating Family Members with Sensory Disabilities (Visual/Hearing)
Set up alternative emergency alert methods including vibrating alerts, visual notifications like flashing lights, and phone calls from neighbors. Standard sirens and announcements often fail to reach deaf or blind residents.
Verbally describe each step of the evacuation process and surrounding environment as it happens. “We’re walking to the car now, there’s a curb in two steps, the car door is on your right.”
Bring extra batteries for hearing aids, backup hearing devices, and portable chargers. Store them in waterproof containers since moisture ruins electronics quickly.
Use tactile guidance during movement by offering your arm for a blind family member to hold just above the elbow. This allows them to feel your body movements and anticipate direction changes.
Maintain physical contact during transitions between locations, vehicles, and spaces. Your family member always knows where you are even when noise or darkness makes communication difficult.
Establish communication protocols if you become separated. A predetermined meeting spot and a designated contact person who will relay messages between you.
Pack communication cards with large text or Braille that explain your family member’s disability and needs. You might need to interact with emergency responders or shelter staff who are unfamiliar with disability accommodations.
Evacuating Family Members with Cognitive or Developmental Disabilities
Maintain a calm demeanor even when you feel stressed. Your family member will mirror your emotional state. If you panic, they will panic harder and longer.
Bring familiar comfort items like their preferred stuffed animal, special blanket, favorite toy, or sensory item. Even if it seems unnecessary. Familiar objects reduce anxiety during chaos. Pack the blue elephant, even if there’s barely room, because that elephant might prevent a meltdown at 2 a.m. in a noisy shelter.
Use simple, clear language without metaphors or complex explanations. Say “We’re leaving because water is coming” instead of “We need to evacuate due to rising floodwaters.”
Create visual schedules showing the evacuation sequence with pictures or simple drawings. Your family member can see what happens next and mentally prepare for each transition.
Reduce sensory overload by bringing noise-canceling headphones, sunglasses, or a hoodie to block overwhelming stimuli from sirens, crowds, and unfamiliar shelter environments.
Keep routines as consistent as possible. Maintain meal times, medication schedules, and sleep routines even during evacuation. Routine provides stability when everything else is chaotic.
Bring communication boards, picture cards, or tablet apps for non-verbal individuals. They can express needs, discomfort, or fear without relying on speech that may not come during high-stress situations.
If evacuation becomes too dangerous because water’s rising faster than expected, roads are already flooded, or your family member can’t be moved safely, call 911 immediately and request specialized assistance. Emergency responders have accessible transportation, rescue equipment like basket stretchers that work better than wheelchairs in water, and training in disability evacuation. Describe your family member’s specific disability and mobility limitations so responders bring the right equipment. Stay on the line and move to the highest floor or roof if water enters your home.
Mobility Equipment and Assistive Device Protection During Flood Evacuation
Moving wheelchairs through floodwater is extremely dangerous. Never navigate a wheelchair through moving water deeper than 3 inches because wheels lose traction and the entire chair can float away, taking your family member with it. Caregivers pushing wheelchairs shouldn’t enter water deeper than 6 inches because water flowing at just 6 mph exerts the same force as EF5 tornado winds, which will sweep you off your feet.
Pre-arranged accessible transportation is critical because last-minute vehicle searches during active flooding rarely work. Contact local government evacuation services, disability transportation providers, or friends with accessible vans weeks before flood season starts. Confirm they have working ramps or lifts, proper wheelchair tie-downs, and drivers trained in securing mobility equipment safely.
| Equipment Type | Pre-Evacuation Actions | Transport Method | Water Protection |
|---|---|---|---|
| Manual Wheelchairs | Check tire pressure, test brakes, pack repair tools | Secure in vehicle with 4-point tie-downs, never just seat belts | Cover seat and wheels with garbage bags, dry immediately after exposure |
| Powered Wheelchairs | Fully charge batteries, disconnect battery if submersion risk exists | Heavy-duty vehicle with ramp and increased weight capacity required | Wrap control panel and battery compartment in multiple layers of plastic wrap, seal with waterproof tape |
| Walkers and Canes | Attach reflective tape for visibility, check rubber tips for wear | Place in vehicle trunk or secure to prevent becoming projectiles | Minimal protection needed, wipe dry and check stability after water exposure |
| Hospital Beds | Lower to minimum height, lock wheels, unplug from power | Cannot be transported, note location for insurance claim | Elevate on blocks or move to second floor if possible, photograph for documentation |
| Patient Lifts | Test battery charge, pack sling attachments separately | Portable lifts can fit in larger vehicles, ceiling lifts must be left behind | Wrap motor and controls in waterproof material, keep slings in sealed plastic bags |
| Shower Chairs | Pack if vehicle space allows, otherwise plan to use shelter equipment | Lightweight chairs fold flat and fit in trunk space | Rinse and dry after exposure, minimal damage from brief water contact |
| Prosthetic Devices | Pack backup prosthetic if available, bring all liner and sock supplies | Store in protective case to prevent damage during transport chaos | Keep in waterproof bag, dry completely before reattaching to prevent skin breakdown |
Secure wheelchairs in vehicles with proper four-point tie-downs that attach to the wheelchair frame, not the wheels or armrests. Test the tie-downs by pushing hard on the wheelchair from different angles. If it shifts at all, the tie-downs aren’t secure enough to withstand sudden stops or rough roads. Cover electronic wheelchair controls with waterproof material like plastic wrap sealed with tape. Even humidity from being near water can damage sensitive electronics.
Protect wheelchair cushions and padding by wrapping them in garbage bags or storing them in plastic containers. Waterlogged foam takes days to dry and can cause pressure sores. Bring a backup manual wheelchair if you own one, even if your family member primarily uses a powered chair. Manual chairs work when power fails and weigh less for emergency transfers. Pack alternative mobility aids like a rolling walker or cane. They may work better than wheelchairs in crowded shelter conditions or if the wheelchair gets damaged.
Safe transfer techniques become critical when assistive devices fail or can’t be used.
Use two-person lift methods whenever possible, with one person supporting the torso and one supporting the legs. Coordinate each movement with clear verbal cues like “lift on three.”
Maintain three points of contact at all times during transfers. Keep at least one hand and both feet, or both hands and one foot, in stable contact with solid surfaces.
Support weak or paralyzed limbs explicitly. Never assume your family member can control them even partially during the stress and chaos of evacuation.
Communicate clearly before each movement. “I’m going to put my arm under your knees now” so your family member can prepare mentally and physically.
Prepare a stable surface before starting the transfer. Check that chairs, beds, or seats won’t shift when weight gets applied.
Know when to request emergency responder assistance rather than attempting dangerous transfers alone. Especially if your family member weighs more than you can safely lift, water is present, or the transfer requires navigating stairs or obstacles.
Test your planned evacuation routes in advance by actually driving them with the wheelchair loaded and secured. Check for low clearance areas, sharp turns that might shift equipment, and rough roads that could damage sensitive medical devices. Confirm that your vehicle’s accessibility features like ramps and lifts work reliably under time pressure. Not just in your driveway but in the chaotic conditions of mass evacuation.
Medical Equipment, Medications, and Emergency Supplies for Disabled Family Members

Power-dependent medical equipment stops working during floods when electricity fails. Oxygen concentrators, ventilators, CPAP machines, powered wheelchairs, feeding pumps, and suction devices all require either continuous power or frequent charging. Keep at least two weeks of prescription medications on hand at all times, stored in waterproof containers. Pharmacies close during disasters and refills become impossible.
| Equipment Type | Backup Power Solution | Transport Method | Critical Notes |
|---|---|---|---|
| Oxygen Concentrators | Portable oxygen tanks (at least 3-day supply), battery backup if available | Secure tanks upright in vehicle, never on their side | Calculate tank duration before leaving: check pressure gauge and flow rate, run out of oxygen = life-threatening emergency |
| Ventilators | Fully charged internal battery, external battery pack, manual resuscitation bag | Medical transport vehicle or ambulance required for most ventilators | Contact emergency services immediately if evacuation needed, don’t attempt without trained medical support |
| Powered Wheelchairs | Fully charged batteries, portable charger, car adapter, backup manual chair | Accessible van with ramp and heavy-duty tie-downs rated for chair weight | Battery life drops in cold weather, charge completely before leaving even if gauge shows partial charge |
| CPAP Machines | Battery pack designed for CPAP use, car adapter for charging during travel | Pack in original case or padded container to prevent damage | Can skip 1-2 nights if necessary, but fatigue increases danger during evacuation tasks |
| Feeding Pumps | Fully charged battery, car adapter, gravity feeding supplies as backup | Keep upright during transport, pack extra feeding bags and tubes | Bring manual feeding syringes in case pump fails completely |
| Suction Devices | Battery-powered portable suction unit, manual suction bulb as backup | Pack in readily accessible location for immediate use if needed | Keep suction catheters in waterproof bag, moisture ruins sterile packaging |
| Nebulizers | Battery-powered portable nebulizer, multiple doses of medication | Store in protective case with medications in waterproof inner bag | Bring rescue inhaler as faster alternative during evacuation |
Waterproof all medications by placing bottles or blister packs inside sealed plastic bags, then placing those bags inside a rigid waterproof container like a plastic food storage container with a tight-fitting lid. Write medication names, dosages, and prescribing physician information on waterproof paper using permanent marker, and tape this list to the outside of the container. If medications require refrigeration, pack them in an insulated container with ice packs. Plan to reach your shelter destination within the time your ice packs remain frozen, usually 6 to 12 hours depending on outside temperature.
Disability-specific emergency supplies beyond standard disaster kits:
Incontinence products including at least a 7-day supply of adult diapers, pads, wipes, and disposal bags. Shelters rarely stock these items and running out creates dignity and health problems.
Specialized nutrition including formula, thickened liquids, pureed foods, or specific dietary items for feeding tubes, allergies, or medical conditions that restrict normal food options.
Catheter supplies with extra catheters, sterile gloves, lubricant, and collection bags. Plus waterproof tape to secure tubes during movement.
Glucose monitoring supplies for diabetics including test strips, lancets, backup meter, fast-acting glucose tablets, and insulin with cooling pack.
Extra hygiene and sanitation supplies like waterless shampoo, body wipes, antimicrobial skin cream, and extra towels for disabled individuals who require more frequent cleaning.
Wound care materials including sterile gauze, medical tape, antibiotic ointment, and bandages for pressure sores or existing wounds that need continued treatment.
Backup glasses or contact lenses with solution. Losing vision aids during evacuation eliminates independence and creates safety hazards.
Hearing aid batteries in waterproof container, at least a 2-week supply, plus backup hearing aids if available.
Communication boards, picture cards, or charged tablet with communication apps for non-verbal individuals who rely on these tools for basic needs.
Comfort items for cognitive disabilities including weighted blankets (if transportable), fidget tools, noise-canceling headphones, and familiar objects that reduce anxiety.
Equipment repair tools like wheelchair tire repair kit, walker replacement tips, extra wheelchair spokes, and basic tools like screwdrivers and pliers.
Waterproofed medical records and prescriptions including diagnosis information, medication lists, doctor contact information, and medical insurance cards in sealed plastic sleeve.
Service animal food, water, medications, comfort items, leash, waste bags, and vaccination records in waterproof folder.
Create two separate kits. The grab-and-go kit should be a backpack or rolling bag that contains only the most critical supplies you can carry quickly. 3 days of medications, essential medical equipment, communication tools, and basic comfort items. The comprehensive home kit should contain 7 to 14 days of supplies and can be larger and heavier since you’ll load it into a vehicle with more time. Store both kits in easy-to-access locations. Not in closets or basements that might flood first. Waterproof everything using sealed plastic bags inside rigid containers, and test that containers actually seal by submerging them in a sink for 10 minutes.
Communication Networks and Early Warning Systems
A flood watch means flooding’s possible based on weather conditions. A flood warning means flooding’s already happening or will happen very soon. Disabled family members need to evacuate during a flood watch, not wait for a warning. The extra time required for mobility equipment, medical device setup, and accessible transportation means that waiting until flooding’s confirmed often means waiting too long.
Register your household with your local emergency management office’s disaster registry or special needs registry so they know a vulnerable person lives at your address. This sometimes gets you earlier notifications and priority assistance, though you can’t rely on government help alone.
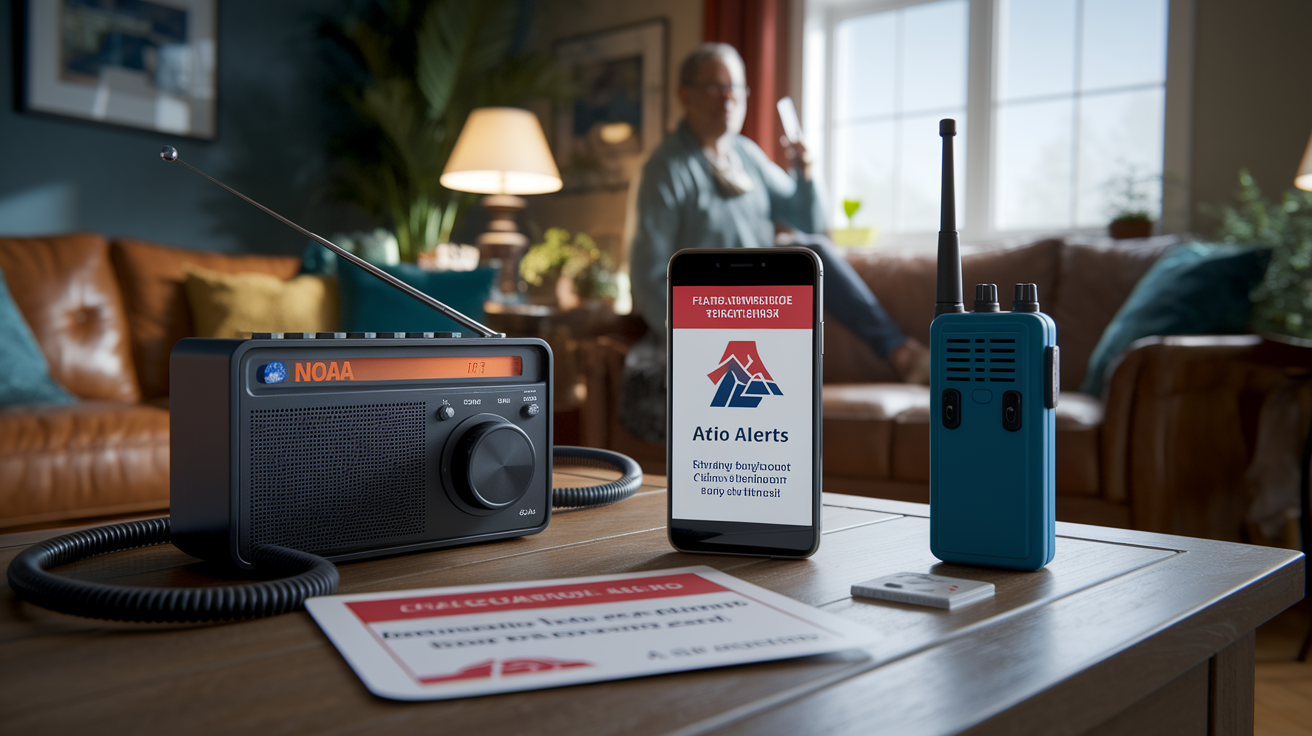
NOAA Weather Radio with visual strobe lights and vibrating alerts for hearing-impaired family members. Audio-only alerts fail to wake or notify deaf individuals.
Wireless emergency alerts activated on multiple family member cell phones with text-to-speech enabled and maximum volume settings.
Neighbor check-in agreements establishing which immediate neighbors will knock on your door and assist with evacuation if they see severe weather approaching.
Local disability advocacy organizations that coordinate emergency communication and sometimes offer accessible transportation during disasters.
Hand-held radios like walkie-talkies that work when cell towers fail, distributed to neighbors who agreed to help so you can coordinate without phones.
Alternative alert methods for deaf or blind individuals including smart home devices with visual displays, vibrating wristbands, or phone apps that flash the screen and vibrate.
Community alert systems like Nextdoor neighborhood groups, text message chains, or email lists where neighbors share real-time flood updates.
Direct phone calls from designated friends or family members who monitor weather and will call specifically to tell you to evacuate now.
| Contact Type | Name/Organization | Phone | Purpose | Communication Method |
|---|---|---|---|---|
| Out-of-area emergency contact | Relative or friend living 100+ miles away | [Fill in] | Relay messages when local phones fail, track your evacuation status | Text messages, voicemail, email |
| Immediate neighbor contact | Neighbor who agreed to alert and assist you | [Fill in] | First line of defense, physical door knock when alerts fail | In-person, hand-held radio |
| Medical equipment provider | Company that supplies oxygen, wheelchair, etc. | [Fill in] | Equipment replacement, repairs, emergency supply delivery | 24-hour support line |
| Disability services coordinator | Local disability advocacy organization | [Fill in] | Coordinate accessible transportation, shelter information | Phone, email during business hours |
| Accessible transportation service | Paratransit, accessible van service, or volunteer driver | [Fill in] | Pre-arranged evacuation transportation | Phone dispatch, online booking if available |
| Local emergency management | County or city emergency management office | [Fill in] | Official evacuation orders, accessible shelter locations | Emergency hotline, website updates |
Non-verbal family members need communication boards showing pictures or words for basic needs like “bathroom,” “pain,” “medication,” “hungry,” “scared,” and “help.” Laminate these boards or seal them in clear plastic sleeves so they survive if they get wet. Pack them in the grab-and-go kit where they can be accessed immediately. Not buried under other supplies.
Pre-arrange meeting locations that are wheelchair accessible, easy to find even in darkness or heavy rain, and far enough from flood zones to remain safe. Gas stations at highway exits work better than parks or schools because they have lighting, shelter, and landmarks. Choose a primary meeting spot and two backups in case the first becomes inaccessible. Everyone in the family must memorize these locations because cell towers typically fail during disasters and you can’t look up addresses.
Test all communication methods during practice drills. Send a text to your out-of-area contact. Use the hand-held radio with your neighbor. Trigger the NOAA Weather Radio and verify the visual and vibrating alerts work. Check that your disabled family member’s communication board has all needed phrases. Confirm everyone knows the meeting locations without looking them up on their phone. Testing reveals problems like dead batteries, wrong phone numbers, or communication tools that seemed good in theory but fail under pressure.
Caregiver Safety and Physical Assistance Protocols

Caregiver safety isn’t optional or selfish. If you get injured or swept away trying to help your disabled family member, now two people need rescue instead of one. Your safety is the foundation that makes helping your family member possible.
Immediate neighbors are your first line of defense during natural disasters. Make neighbor check-in agreements now, before flood season, with at least two households who will assist you during evacuation. Show them where your supplies are stored, how your family member transfers, and what help you need. The buddy system where neighbors support each other saves lives when emergency responders are overwhelmed.
Never push wheelchairs through water deeper than 6 inches. Caregivers standing in 6 inches of swift water face the same force as standing in EF5 tornado winds, which will knock you down and sweep you away.
Understand water force equivalence. Water moving at just 6 mph pushes with the same pounds per square inch as 250 mph tornado winds. That’s why water that looks calm can still kill you.
Use safe transfer techniques under emergency conditions by keeping your back straight, bending your knees, using leg muscles instead of back muscles, and never twisting while lifting.
Recognize caregiver physical limits honestly and without guilt. If your family member weighs more than you can safely lift, or if you have back problems, or if you’re exhausted from packing, you can’t perform heroic transfers without destroying your body.
Two-person assistance whenever possible splits the weight, provides stability, and allows one person to guide while the other lifts. Reducing injury risk for everyone.
Pre-established neighbor agreements for backup support mean calling your neighbor contact for physical assistance instead of attempting dangerous lifts alone.
Backup caregiver identification and contact information written down and stored in waterproof container ensures that if you get injured, emergency responders know who else is trained to care for your family member.
Communication protocols when separated from disabled family member including agreed-upon meeting location and emergency contact who will relay messages if phones fail.
Know when to stop attempting evacuation and call 911 for emergency responder assistance. If water’s rising faster than expected and is already at your doorstep, stop loading the car and call 911 now. If your family member can’t be safely transferred from wheelchair to vehicle, call 911 and request accessible rescue transport. If you’re exhausted and shaking and can’t safely lift your family member, call 911 before attempting a transfer that injures both of you. Emergency responders have basket stretchers, flotation devices, and multiple trained people who can perform rescues that are impossible for one or two family caregivers. Calling for help isn’t failure. It’s recognizing reality and choosing the option that keeps everyone alive.
Navigating Floodwater Safely With Disabled Family Members

Avoiding floodwater completely is always the safest choice. But sometimes brief water exposure becomes unavoidable during evacuation when the only path from your home to your vehicle crosses a flooded area, or when water rises faster than expected and you must move through it to reach higher ground.
| Water Depth | Mobility Equipment Risk | Caregiver Risk | Action Required |
|---|---|---|---|
| 0-3 inches | Wheelchair wheels lose grip, chair may float, electronic controls damaged by moisture | Caregiver stable and can walk safely | Maximum safe depth for wheelchair use, move slowly, test ground with each push |
| 3-6 inches | Wheelchair unusable and will float away | Caregiver walking possible but difficult, risk of losing balance | Carry disabled person if physically possible, leave wheelchair behind, move to higher ground immediately |
| 6-12 inches | N/A – no mobility equipment usable | Caregiver swept away risk becomes high, same force as tornado winds | Stop and call 911, don’t attempt to cross, wait for rescue with flotation equipment |
| 12-24 inches | N/A – extreme danger | Vehicles swept away, person swept away almost certain | Evacuate to higher ground immediately, second floor or roof if water reaches this depth |
| 24+ inches | N/A – life-threatening emergency | N/A – survival situation | Roof or upper floor refuge only, call 911 and wait for helicopter or boat rescue |
Life jackets are required for disabled family members with limited mobility or who can’t swim. If they fall or are swept away they can’t keep themselves afloat. Regular life jackets may not work for people who can’t hold their head up or maintain a stable position, so look for Type I life jackets designed for unconscious wearers that automatically turn the person face-up. Some wheelchair users need flotation devices that attach to the chair itself, like inflatable wheelchair flotation systems, though these are expensive and only work in slow-moving water.
Debris hidden under floodwater creates hazards that disabled individuals may not see or avoid quickly. Downed power lines, sharp metal, broken glass, displaced manhole covers, and washed-out road sections all hide under brown, murky water. A person using a wheelchair can’t jump away from sudden hazards. A blind person can’t see debris floating toward them. Use poles, canes, or long sticks to tap the ground ahead of each step, feeling for solid surface and detecting holes or drop-offs before putting weight down.
Floodwater contains sewage, chemicals, oil, pesticides, and animal waste that create serious health risks. Especially for disabled individuals with open wounds, pressure sores, or compromised immune systems. Any skin exposed to floodwater needs immediate cleaning with clean water and soap or hand sanitizer as soon as you reach safety. Wounds exposed to floodwater can become infected within hours. If your disabled family member has pressure sores, catheter sites, or feeding tube sites, keep these areas covered and protected from water contact if possible, and clean them thoroughly with sterile supplies as soon as you can.
Immediately after exiting floodwater, remove wet clothing and shoes, dry skin thoroughly, and change into clean dry clothes from your emergency kit. Check skin for cuts, scrapes, or irritation. Apply antibiotic ointment to any open areas. Monitor for signs of infection including redness, swelling, warmth, or fever in the following days.
Accessible Shelter Verification and Service Animal Policies
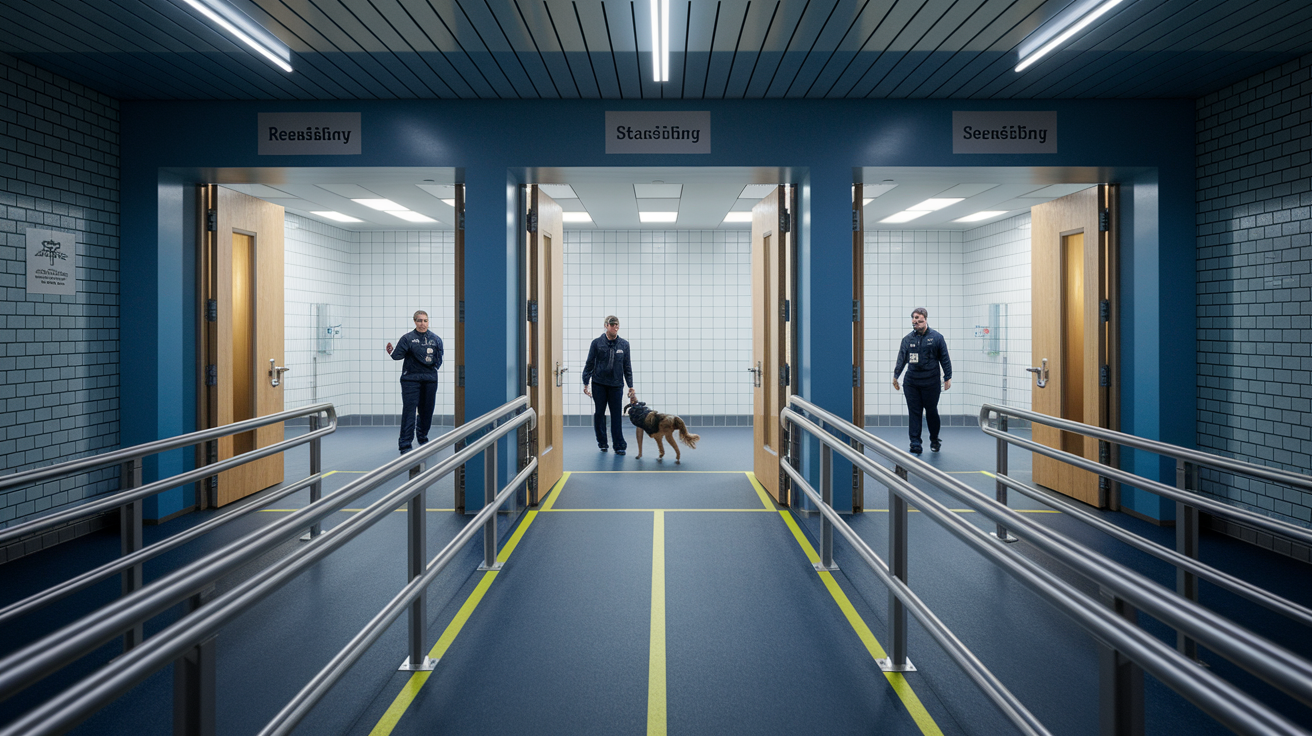
The Americans with Disabilities Act requires emergency shelters to provide equitable access for people with disabilities. But compliance often fails during actual disasters when shelters become overcrowded, staff are overwhelmed, and accessible features break down or run out.
Call shelters before evacuating to verify accessibility features actually exist and currently work.
Wheelchair-accessible entrances with ramps or zero-step entries that don’t require navigating stairs. Temporary ramps set up during disasters are often too steep or unstable.
Accessible bathrooms with wide doors, grab bars, wheelchair-height sinks, and transfer space. Not just one accessible stall that 50 wheelchair users must share.
Accessible sleeping areas at ground level or with working elevators. Climbing stairs is impossible for many disabled individuals and elevators fail during power outages.
Service animal acceptance policies confirmed by name. ADA requires this but individual shelter staff sometimes refuse animals due to ignorance of the law.
Power outlets located near sleeping areas for medical equipment, CPAP machines, powered wheelchairs, and charging phones. With confirmed access rather than outlets all being used by other evacuees.
Accessible shower facilities with roll-in showers or transfer benches, grab bars, hand-held shower heads, and non-slip floors.
Visual and audible emergency alerts so both deaf and blind evacuees receive warnings if conditions change and the shelter must be evacuated.
Staff trained in disability assistance who know how to communicate with non-verbal individuals, assist with transfers, and recognize medical emergencies specific to certain disabilities.
Refrigeration for medications that require cool storage, with confirmed space available rather than refrigerators already full.
Quiet areas for sensory-sensitive individuals away from the main shelter chaos. Even if just a separated corner or side room with reduced noise and lighting.
Pre-register with shelters when possible by calling their non-emergency number weeks before flood season and providing information about your family member’s disability, required accommodations, and equipment needs. Registration doesn’t guarantee space but increases the likelihood that staff will prepare accessible areas and reserve power outlets. Write down the names of staff members you spoke with and confirmation numbers if provided.
Identify 2 to 3 backup shelter options in different geographic locations in case your primary shelter loses accessibility, reaches capacity, or becomes unreachable due to road closures. Know the route to each shelter and driving time under normal conditions, then triple that time for evacuation traffic. Arriving at a shelter and discovering it can’t accommodate your family member after a 3-hour drive creates a dangerous situation with few options.
Service animals are legally protected in all emergency shelters under the ADA. Shelters can’t refuse entry to legitimate service animals or charge fees. Emotional support animals don’t have the same legal protection and may be refused. Bring service animal supplies including at least a 7-day supply of food, collapsible water bowl, waste bags, leash, comfort items like a familiar blanket, and medications if needed. Carry vaccination records in a waterproof folder since some shelters request proof even though they can’t legally require it.
Vehicle Safety for Transporting Disabled Passengers During Floods
One foot of moving water will sweep away most cars. Two feet of rushing water will sweep away nearly any consumer vehicle including trucks and SUVs. Water flowing at just 6 mph exerts the same force per square inch as air moving at 250 mph. EF5 tornado wind speeds. This means what looks like a harmless puddle can hide deadly current strength.
Disabled passengers face extra danger because they can’t quickly exit vehicles if water rises. Wheelchair tie-downs take time to release. Passengers who can’t swim, can’t walk, or can’t climb out windows need significantly more time to escape than able-bodied passengers. This makes vehicle water exposure exponentially more dangerous.
Never drive through flooded roads regardless of how urgent evacuation feels. You can’t see road damage, water depth, or current speed, and one mistake kills everyone in the car.
Turn around immediately if you encounter any water on the road, even if it looks shallow. Water depth changes rapidly and roads wash out underneath even when the surface looks intact.
Practice immediate vehicle abandonment procedures if caught in rising water by releasing all wheelchair tie-downs and passenger restraints within 30 seconds. Know which doors open easiest, and get everyone out and moving to higher ground before water reaches window level.
Ensure disabled passengers can be quickly freed from wheelchair tie-downs and restraints before departure by testing the release mechanisms. Keep tools accessible to cut restraints if needed, and assign one person whose only job during emergency exit is freeing the disabled passenger.
Secure all mobility equipment and medical devices before driving using tie-downs, bungee cords, or cargo nets to prevent wheelchairs, oxygen tanks, or medical equipment from becoming projectiles that injure passengers during sudden stops.
Choose higher-elevation routes even if significantly longer. Add an hour to travel time rather than saving 20 minutes by driving through flood-prone low areas.
Monitor real-time road condition reports and closed road lists using 511 services, local emergency management websites, or traffic apps. Update routes as conditions change.
Keep emergency glass-breaking tools accessible in the driver’s door pocket and center console. Not buried in trunk cargo. Windows must be broken quickly if vehicle becomes submerged.
Practice emergency exit procedures with disabled family member in advance by sitting in the parked vehicle and physically going through the motions of releasing tie-downs, opening doors, and describing who does what during evacuation.
Alternative evacuation methods become necessary when vehicle transport is impossible. If roads are already flooded and you can’t safely drive, call 911 and request accessible emergency transport. Describe your family member’s disability and mobility limitations so responders send appropriate vehicles. High-water rescue vehicles with raised chassis can navigate water depths that would sweep away cars. Helicopter evacuation is available for stranded disabled individuals when ground rescue becomes too dangerous, though limited helicopter availability means you may wait hours and must move to roof or upper floor.
Final Words
Knowing how to evacuate with a disabled family member during a flood starts with early action and realistic planning.
Test your routes, time your transfers, and pack those medical supplies now.
Call your local emergency management office today and get registered. Verify that shelter is actually accessible. Practice with your neighbor.
These steps take time, but they buy safety when water starts rising. You’ve got this.
FAQ
How to evacuate a person with disability?
To evacuate a person with disability, start by leaving 2-4 hours earlier than the general population to allow extra time for mobility challenges, gathering medical equipment, and using accessible transportation with verified routes to ADA-compliant shelters.
How do disabled people evacuate?
Disabled people evacuate by using pre-arranged accessible transportation, bringing essential medical equipment and assistive devices, relying on caregiver support or buddy systems, and registering with local emergency management as vulnerable households needing specialized assistance.
What are the four elements of evacuation information that individuals with disabilities need?
Individuals with disabilities need four elements of evacuation information: accessible alert methods suited to sensory disabilities, extra time to prepare and leave safely, confirmed accessible transportation and shelter locations, and backup power for medical equipment.
What are the 5 P’s of evacuation?
The 5 P’s of evacuation are People (family and pets), Prescriptions (medications and medical equipment), Papers (important documents in waterproof bags), Personal needs (clothing and hygiene supplies), and Priceless items (irreplaceable keepsakes you can carry quickly).
When should wheelchair users evacuate during a flood?
Wheelchair users should evacuate during a flood watch, not waiting for a flood warning, and should leave 2-4 hours earlier than the general population to account for slower mobility, equipment setup time, and accessible route requirements.
How deep can a wheelchair go in floodwater?
A wheelchair can go a maximum of 3 inches in moving floodwater before wheels lose grip and the chair can float away, while caregivers pushing wheelchairs should not enter water deeper than 6 inches to avoid being swept off their feet.
What medical supplies do disabled family members need during evacuation?
Disabled family members need during evacuation at least two weeks of prescription medications, backup power for devices like oxygen concentrators or ventilators, assistive equipment like wheelchairs or walkers, and disability-specific supplies like incontinence products or feeding equipment.
How do you communicate with disabled family members during a flood?
You communicate with disabled family members during a flood using alternative alert methods like vibrating alarms or visual notifications for hearing-impaired individuals, verbal descriptions for visually impaired people, hand-held radios when cell towers fail, and communication boards for non-verbal individuals.
What accessibility features should you verify at emergency shelters?
You should verify at emergency shelters wheelchair-accessible entrances and bathrooms, ground-level sleeping areas with nearby power outlets for medical equipment, service animal acceptance, accessible showers with grab bars, visual and audible alerts, and staff trained in disability assistance.
How do you protect mobility equipment during flood evacuation?
You protect mobility equipment during flood evacuation by waterproofing electronic controls with plastic coverings, securing wheelchairs in vehicles with proper tie-downs, bringing backup manual wheelchairs if possible, and packing alternative mobility aids in waterproof containers.
What transfer techniques are safe during flood evacuation?
Safe transfer techniques during flood evacuation include using two-person lift methods when possible, maintaining three points of contact, supporting weak or paralyzed limbs, communicating clearly before each movement, and knowing when to request emergency responder assistance instead of attempting dangerous transfers.
Should you drive through floodwater with a disabled passenger?
You should never drive through floodwater with a disabled passenger because just 1 foot of water can sweep away a car, and disabled passengers may not be able to quickly exit vehicles if caught in rising water.
How do you prepare a home before evacuating with a disabled family member?
You prepare a home before evacuating with a disabled family member by turning off utilities at main switches, unplugging appliances, moving non-portable medical supplies to the highest point, and securing equipment, but never delaying evacuation beyond 10-15 minutes to protect property.