
You’ve probably got your medications sitting in three different rooms right now, and you’re not thinking about them until you need to leave in the next hour. Most people grab their go bag, their phone charger, maybe the dog, and completely forget the pill bottles until they’re already on the road. Then panic hits. Here’s the truth: packing medications wrong during evacuation creates medical emergencies that are totally preventable, and getting it right takes about ten minutes if you know what you’re doing.
Essential Steps for Packing Medications Before an Emergency Evacuation

Getting your medications packed right can be the difference between managing a health condition safely and ending up in serious trouble when you can’t get to a pharmacy. Forget your essential meds, pack them wrong, or let them get soaked, and you’re looking at complications you really don’t want during a disaster. Those folks evacuated from the Alberta fires for weeks? They learned this one the hard way.
Here’s how to pack medications correctly before you evacuate:
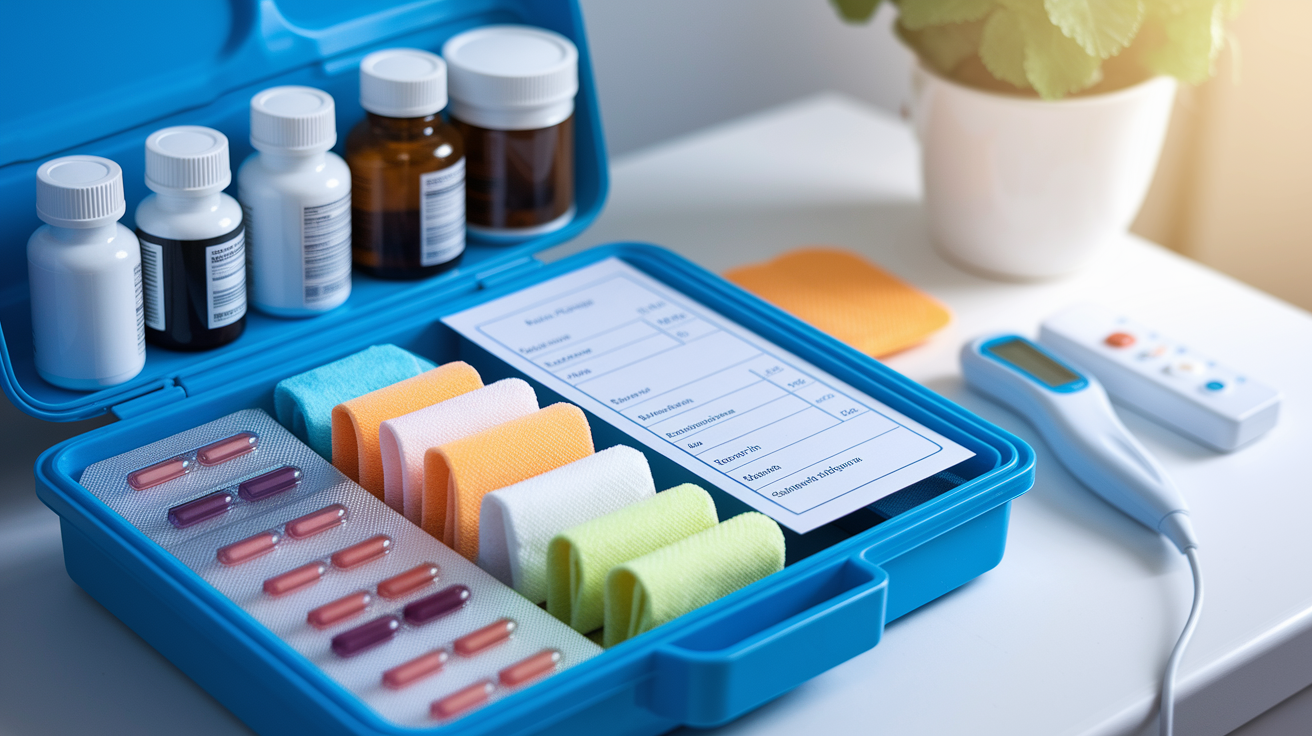
Gather everything. We’re talking prescription drugs, over the counter stuff, medical equipment, all of it. Check medicine cabinets, nightstands, kitchen counters, the fridge, everywhere. Don’t forget vitamins, supplements, creams, and devices like glucose monitors or CPAP machines.
Make a complete list. Write down every medication with dosages, how often you take it, and the generic name. Note what each pill actually looks like (color, shape, markings) in case bottles get separated from labels. Mark which ones you absolutely need versus the ones that are optional.
Grab your prescription copies and pharmacy records. Get printed copies if you don’t have recent ones. Include pharmacy name, phone number, and prescription numbers for everything.
Check your quantities. FEMA and the CDC say you need at least 72 hours worth of meds in your emergency kit. That’s the bare minimum. A 30 day supply makes way more sense, especially if you’re in flood country or wildfire territory where evacuations can stretch on.
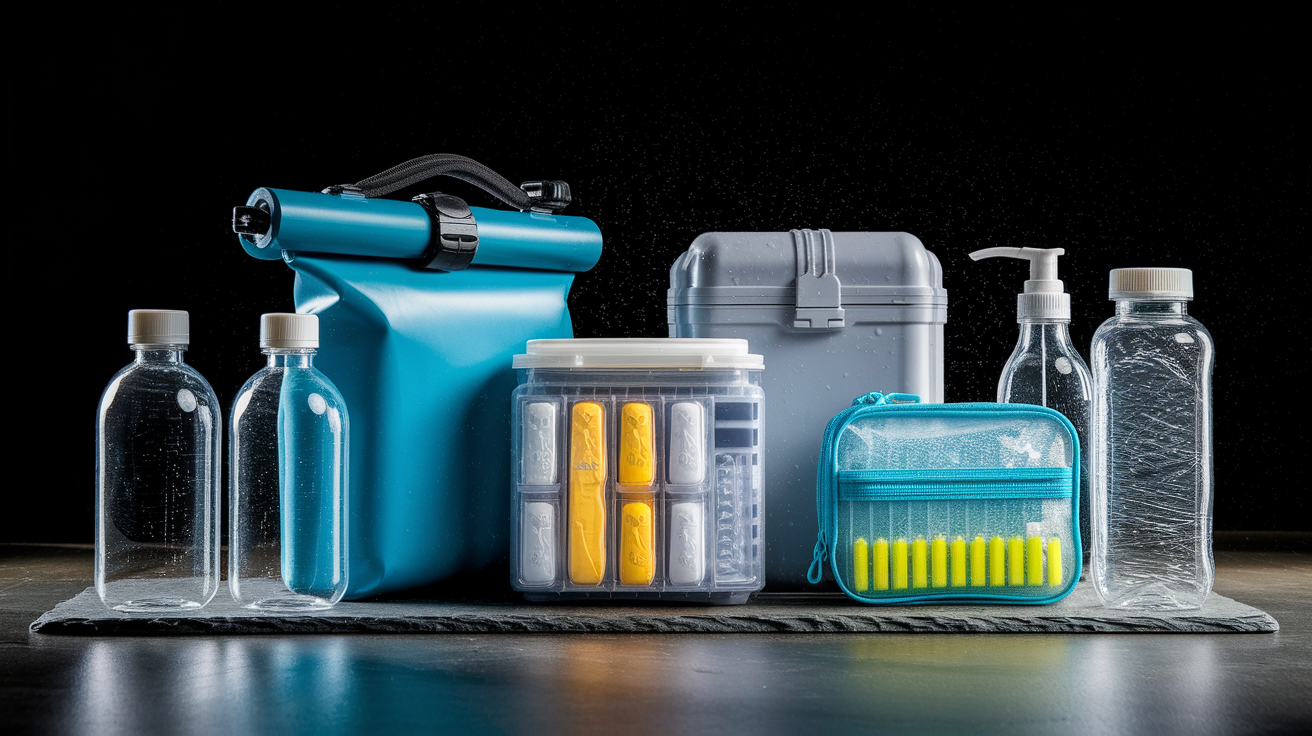
Pick the right waterproof containers. You need crush proof options that’ll protect pills from getting ground into powder. Make sure containers seal completely so moisture stays out.
Keep bottles in their original containers when you can. Those prescription labels have dosing instructions, refill dates, and pharmacy details that ER docs might need. The labels also prove the meds are yours if anyone asks during evacuation.
Set up cooling for temperature sensitive stuff. Insulin and other refrigerated meds stay cold in your fridge for 12 to 24 hours after the power dies, but they need active cooling once you’re on the move. Prep multiple ice packs and rotate them to keep temperature steady.
Make multiple copies of your medical paperwork. Put them in waterproof packaging. Keep one copy with your meds, one in your wallet, one in a separate bag in case your medication kit disappears.
Add allergy info and insurance cards. List drug allergies where emergency responders will see them right away. Include diagnosis information for chronic conditions that need specific medications.
Label everything clearly. Patient names, dosing times, special instructions. Write so family members, shelter workers, or paramedics can give you your meds correctly if you can’t do it yourself. Use waterproof labels or permanent markers that won’t smudge when wet.
Check expiration dates one last time. Toss expired meds and replace them. Make sure you can open all containers quickly, especially those child resistant caps that get impossible to open when you’re stressed.
Put your kit where you can grab it fast. Store it near exit points where you can snag it in 30 seconds or less. Keep it separate from other evacuation supplies so you can take medications even if everything else gets left behind.
Keep your medication kit with you during evacuation, not in a trunk where it might overheat or become impossible to reach. When you grab your go bag, grab your medications in the same motion. Practice this so it becomes automatic when stress hits. If you’re watching flood evacuation timing, have your medications packed and ready before water reaches decision points, not during the final scramble to leave.
Choosing Waterproof and Protective Containers for Medication Storage
Your container choice determines whether medications arrive dry, intact, and usable or turn into a soggy mess you can’t identify.
Keeping medications in original containers beats transferring them most of the time. Those prescription bottles have pharmacy labels with drug names, dosages, refill info, and prescriber details that prove legitimacy at checkpoints and give critical information to emergency medical personnel. The bottles also protect pills from crushing better than most alternatives. But original bottles aren’t waterproof, so you need an outer protective layer. Put original bottles inside waterproof containers rather than replacing them entirely.
| Container Type | Best For | Protection Level |
|---|---|---|
| Waterproof dry bags (roll top style) | Main medication storage, protecting multiple bottles, document protection | Excellent water protection, good crush protection when packed firmly, best for outer layer |
| Hard sided plastic cases with rubber seals | Temperature sensitive medications, brittle items, expensive medications | Excellent crush protection, very good water protection, rigid structure prevents compression |
| Ziplock bags (freezer weight, double bagged) | Individual medication separation, quick access items, temporary protection | Good water protection if sealed properly, minimal crush protection, budget friendly option |
| Weekly pill organizers in waterproof pouches | Daily medications for elderly users, simplified dosing during stress, multi day supplies | Moderate water protection when in pouches, poor crush protection, requires careful labeling |
| Vacuum sealed bags | Long term storage, pills and tablets (not liquids), space efficient packing | Excellent water protection, good crush protection, extends shelf life for pills stored in cool, dry place (one to two years beyond expiration date) |
Label containers on the outside with waterproof labels or write directly on them with permanent marker. Include your name, the word “MEDICATIONS” in big letters, and emergency contact information. Clear containers let you see contents without opening them, but opaque containers protect light sensitive medications. Choose based on what your medications need. Use bright colors or reflective tape so containers stay visible in dark evacuation conditions or murky floodwater.
Managing Temperature Sensitive and Refrigerated Medications During Evacuation

Insulin, some antibiotics, certain eye drops, and several other medications lose effectiveness or become dangerous when stored outside specific temperature ranges. Figure out which medications need temperature control before evacuation starts so you’re not scrambling at the last minute.
Portable coolers with properly prepared ice packs maintain safe temperatures for refrigerated medications during evacuation transport. Refrigerated medications like insulin stay cold in a fridge for 12 to 24 hours after power dies, giving you a window to prepare. Pack a small insulated lunch bag for portability or a larger cooler if you’ve got vehicle space. Pre freeze ice packs and gel packs so they’re ready when power fails. Frozen water bottles work as backup ice sources and provide drinking water as they melt.
Temperature control tips for evacuations:
Pick insulated bags with thick walls and tight sealing zippers. Thin promotional lunch bags provide almost no temperature protection. Look for bags marketed for insulin transport or medical supply storage that specify how many hours they maintain temperature.
Pack at least four ice packs for rotation. Two ice packs go in the bag with medications while two stay frozen in a working freezer or get replaced at stops with ice access. This rotation maintains consistent cooling.
Expect insulated bags to maintain temperature for four to six hours under normal conditions, less in extreme heat. Plan refreezing stops or ice purchases every four hours during extended evacuations. High quality medical grade coolers last longer but cost more.
Store refrigerated medications in Ziploc bag in toilet tank (not bowl) after fridge warms up. The tank water is 15 to 20 degrees cooler than room temperature during power outages. This backup cooling method works when ice is unavailable, though it’s not ideal for long term storage.
Check medication temperature by touch periodically. If insulin or other refrigerated medications feel warm to the touch or ice packs have completely melted, cooling has failed. Replace ice immediately or use backup cooling methods.
Separate medications from direct ice contact using a thin towel or foam separator. Direct contact with ice can freeze medications, which damages insulin and other temperature sensitive drugs just as much as heat does.
Monitor temperature during extended evacuation by noting when ice packs fully melt and need replacement. If evacuation lasts days and ice becomes unavailable, keep medications in the coolest space available, away from direct sunlight and heat sources. Some medications tolerate short term temperature fluctuations better than others, so knowing your specific medication’s requirements helps prioritize cooling efforts when resources get scarce.
Determining the Right Medication Supply Quantity for Different Evacuation Scenarios

You’ve got to balance preparedness with practical stuff like storage space, medication costs, and insurance coverage limits. A three day supply might work for areas with low disaster risk, but those Alberta fire victims needed way more.
| Evacuation Duration | Minimum Supply | Recommended Supply | Considerations |
|---|---|---|---|
| Short term (overnight to 48 hours) | 2 days of all medications | 3 to 5 days | Unexpected delays, road closures, shelter capacity issues can extend short evacuations |
| 72 hour kit (standard emergency) | 3 days of all medications | 7 days | Federal guidelines recommend 72 hours as absolute minimum, but one week covers typical shelter stays |
| Week long evacuation | 7 days of all medications | 14 days | Flooding, wildfires, and hurricanes commonly require week plus evacuations before home access returns |
| Extended evacuation (weeks to months) | 14 days of all medications | 30 days | Catastrophic events may prevent pharmacy access for weeks, 30 day supply allows time to establish care in new location |
Getting backup prescriptions within insurance limitations requires planning ahead. Insurance companies typically only cover 30 day supply, so you’ll pay out of pocket for emergency stock. Request vacation overrides from your doctor if you’re building an emergency kit, explaining you need backup supplies for disaster preparedness. Some doctors write overlapping prescriptions or increase quantities to help patients stockpile medications. Fill prescriptions as soon as you’re eligible rather than waiting until medications run out. This creates a rolling buffer where you always have extra pills in reserve. Talk to your doctor about generic substitutes if your regular medication is expensive and paying out of pocket for emergency supplies strains your budget. Generic versions cost way less while providing equivalent effectiveness for most medications.
Track medication inventory using a simple spreadsheet or written list noting medication names, quantities, and expiration dates. Update the list every time you add to or use from your emergency supply.
Packing Over the Counter Drugs and First Aid Supplies with Prescriptions
Over the counter drugs matter during emergencies because minor ailments become major problems when you can’t access stores or pharmacies. A headache, upset stomach, or allergic reaction that you’d normally fix with a quick store run turns into hours of discomfort and distraction from critical evacuation tasks.
Essential over the counter drugs and first aid supplies to include:
Pain relievers (acetaminophen, ibuprofen, aspirin), antihistamines for allergic reactions, antacids for heartburn and stomach upset, anti diarrheal medication, bandages in multiple sizes, gauze pads and rolls, antiseptic wipes and antibiotic ointment, thermometer (digital, battery powered), tweezers for splinter removal, medical tape and scissors, hand sanitizer (alcohol based, at least 60% alcohol content), daily vitamins if you take them regularly.
Pack a three to seven day supply of over the counter drugs you use regularly, plus single use quantities of items you might need but don’t use often. For example, if you take antacids daily, pack a week’s worth. If you rarely need anti diarrheal medication, pack enough for one or two episodes. Store pills in original bottles when possible, or transfer to small labeled containers with medication names and dosing instructions written clearly. Individually wrapped single dose packets take more space but stay organized better than loose pills in bottles.
Think about family specific needs when packing over the counter supplies. Families with young children need pediatric medication formulations and dosing syringes. Elderly family members may need easier to open containers, larger print labels, and medications for common senior health issues. Include backup glasses, contact lenses, and contact solution if anyone in your household depends on vision correction.
Organizing Medications for Multiple Family Members and Special Medical Conditions
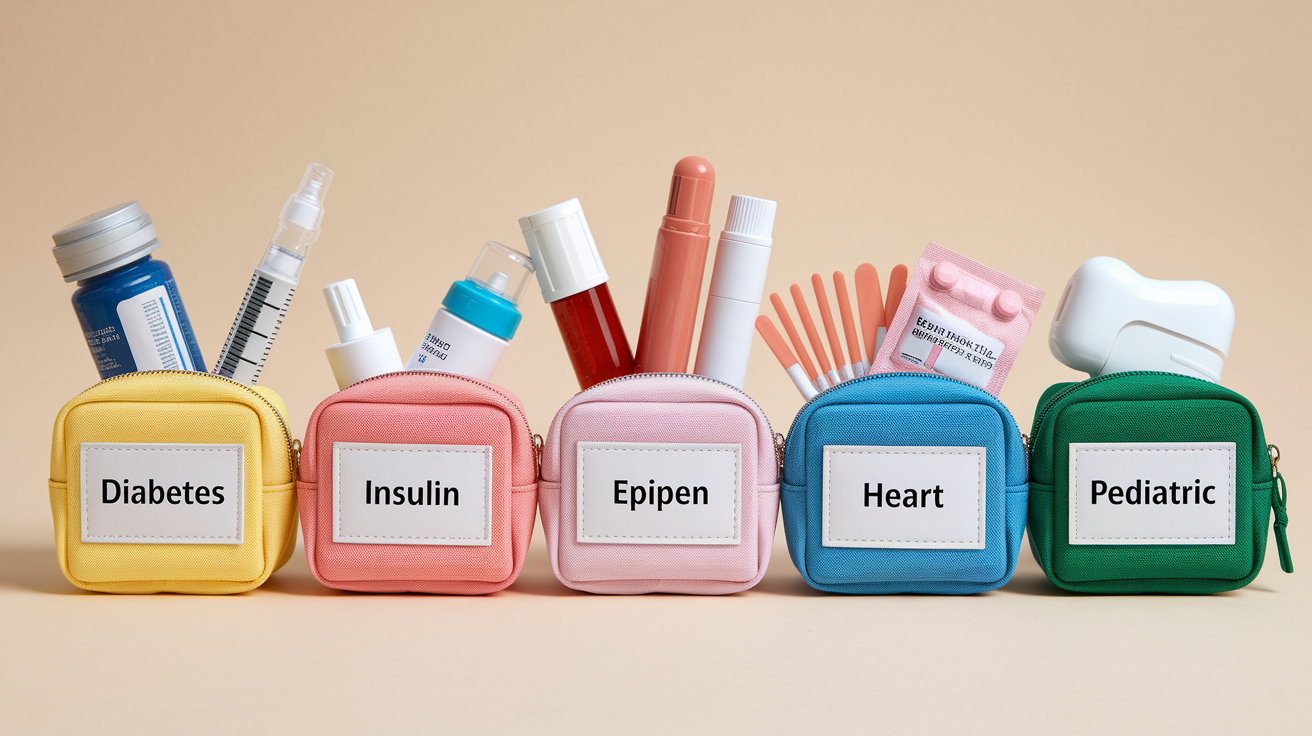
Multi person medication management during evacuations gets complicated fast when bottles look similar, dosing schedules differ, and stress makes everyone forget who takes what when.
Separate medications by person using individual labeled bags or containers within the main medication kit. Write each person’s name in large letters on their bag. Use different colored bags for different family members if possible. This visual separation helps during stressful moments when reading labels carefully feels impossible. Inside each person’s bag, organize medications in the order they’re taken during the day. Morning medications go in one section, evening medications in another.
Special medical equipment and condition specific supplies for different health needs:
Diabetic supplies. Insulin (refrigerated), syringes, lancets, test strips, glucose tablets, glucose monitor, extra batteries for monitor.
Asthma inhalers and spacers. Pack rescue inhaler and daily control inhaler separately, include spacer devices for proper dosing, note expiration dates as inhalers lose pressure over time.
EpiPens for severe allergies. Store in cool, dry location where they last one year, pack two EpiPens in case the first dose doesn’t work, teach family members how to use them.
Heart medication. Include nitroglycerin tablets kept in original dark bottle to prevent light degradation, note they lose potency three to six months after opening.
Blood pressure medication. Critical to maintain during stress when blood pressure naturally rises, skipping doses during evacuation increases heart attack and stroke risk.
Pediatric medication dosing tools. Medicine syringes marked with milliliter measurements, dosing cups, measuring spoons specifically for children’s liquid medications.
Mobility aids. Canes, walkers, shower chairs, or other equipment elderly family members need for daily function.
Child safe packaging prevents accidental poisoning but creates problems during emergencies when adults need quick medication access. Keep critical adult medications in easy open containers and store them in a location children can’t reach. Elderly family members with arthritis or weak grip strength also struggle with child resistant caps. Request easy open caps from pharmacies when filling prescriptions for seniors, or transfer medications to screw top containers with clear labels.
Medical alert bracelets or necklaces become critical during evacuations when family members might get separated or injured. If someone has severe allergies, diabetes, epilepsy, or other conditions requiring immediate specific treatment, they need visible medical identification that emergency responders will check automatically.
Medication Expiration Tracking and Rotation Schedules for Emergency Kits

You can’t ignore expiration dates because medications degrade over time, even when stored in ideal conditions. Taking expired medications during emergencies risks reduced effectiveness or harmful side effects when you need reliable treatment most.
Track expiration dates by creating a medication inventory list that includes medication name, quantity, and expiration date for every item in your emergency kit. Update this list every time you rotate supplies. Set calendar reminders for inventory checks every three to six months. During each check, remove medications expiring within the next six months and replace them with fresh supplies. Use the soon to expire medications as your daily supply rather than wasting them.
Liquid medications expire faster than pills and require more frequent rotation. Pills and tablets last longer in storage, especially when vacuum sealed and stored in cool, dry places where they can last one to two years beyond expiration date. Liquid medications develop crystals, separate into layers, or change color as they degrade. If liquid medications crystallize during storage, use a mortar and pestle to break up the crystals and reconstitute them by mixing thoroughly, though this is a temporary fix and the medication should be replaced soon. Request pill or tablet form from your doctor instead of liquids for longer storage life when building emergency supplies.
Controlled substances like opioid pain medications, ADHD stimulants, and certain anxiety medications require special documentation and cannot be stockpiled the same way as other medications. Keep prescription copies with controlled substances and be prepared to explain why you’re carrying them during evacuations. Some controlled substances have shorter expiration periods due to stability concerns. Rotate these medications more frequently and follow storage instructions precisely.
Update medication supply every one to two years as medications degrade even in ideal conditions. Storage degradation accelerates in hot, humid, or bright environments, so check medications stored in vehicles, garages, or outdoor sheds more often than those kept in climate controlled homes.
Coordinating with Pharmacies to Build Evacuation Ready Prescription Supplies

Getting extra medication supplies legally requires working within insurance rules and pharmacy regulations that restrict early refills and limit quantities. Most systems aren’t designed for disaster preparedness.
Time refills strategically by filling prescriptions on the first day you’re eligible rather than waiting until you run low. If your insurance allows refills at 21 days for a 30 day supply, fill on day 21. This creates a nine day buffer that gradually builds into a larger emergency supply. Some insurance plans offer vacation overrides that allow early refills if you’ll be away from your regular pharmacy. Request these overrides when building emergency supplies, explaining to your doctor and pharmacist that you’re preparing for potential evacuation.
Talk to your doctor about emergency supplies during regular appointments. Explain your evacuation risk based on local flooding, wildfire, or hurricane patterns. Ask if they can write prescriptions for slightly higher quantities or provide duplicate prescriptions you can fill at different pharmacies. Some doctors write prescriptions for 90 day supplies instead of 30 day supplies, which costs less per pill and automatically builds larger reserves. Other doctors provide separate prescriptions specifically labeled for emergency preparedness that you pay for out of pocket.
Out of pocket costs for backup supplies add up quickly, especially for brand name medications. Generic alternatives to expensive medications cost way less while providing equivalent effectiveness for most conditions. Discuss with your doctor whether generic substitutes work for your specific situation. If no generic exists, ask about therapeutic alternatives. Different medications that treat the same condition but cost less. Contact insurance companies to assist in obtaining emergency medication supplies if standard methods don’t work. Some insurers have disaster preparedness programs that waive early refill restrictions for customers in high risk areas.
Consult your pharmacist about medication interactions when adding new over the counter drugs or supplements to your emergency kit. Pharmacists catch dangerous drug combinations that doctors might miss, especially when you see multiple specialists who prescribe without knowing your complete medication list.
Protecting Medications During Natural Disaster Evacuations
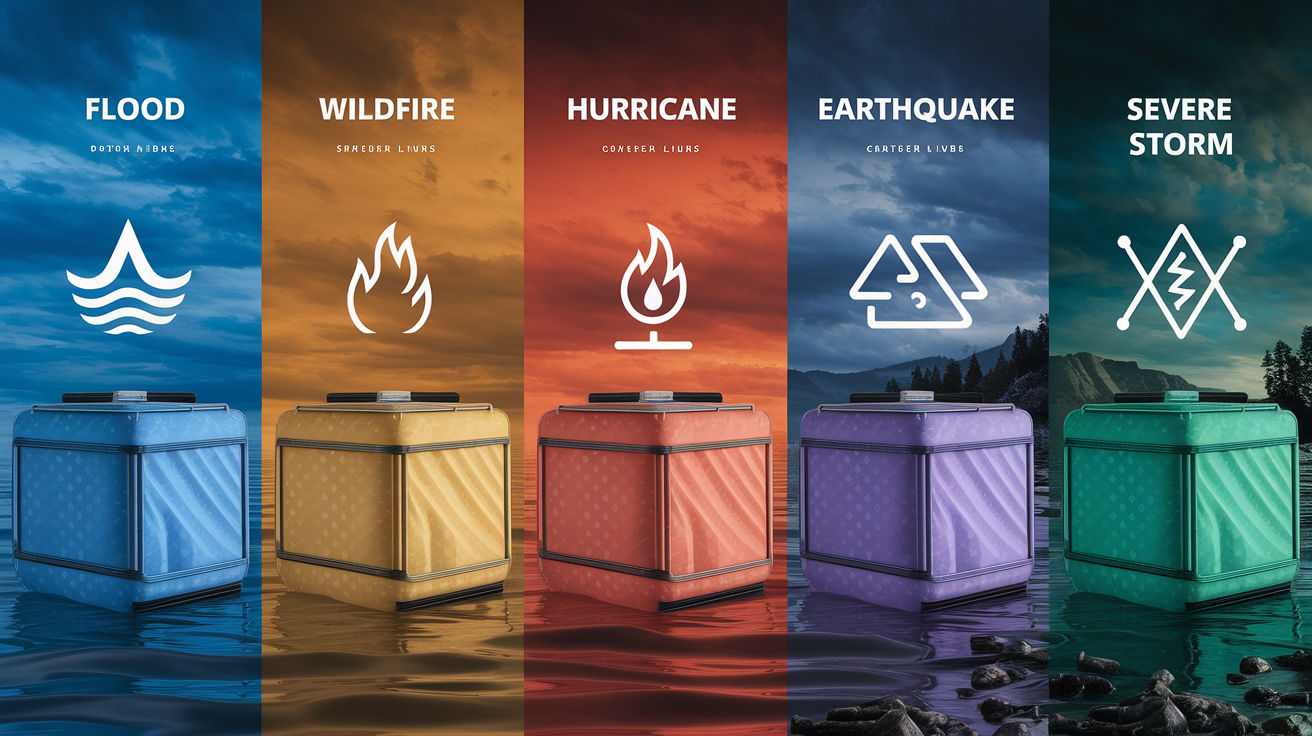
Different disasters create unique medication challenges that require adjusted packing strategies. Water, smoke, extreme temperature, and physical damage during transport all threaten medication integrity in different ways.
| Disaster Type | Primary Medication Risk | Packing Priority |
|---|---|---|
| Flood | Water damage, contamination, loss of refrigeration | Waterproof containers, elevated storage, temperature control backup plans |
| Wildfire | Smoke contamination, rapid evacuation with limited packing time, heat exposure | Pre packed grab bags, heat resistant containers, kept near exit points |
| Hurricane | Extended evacuation duration, water exposure, power loss affecting refrigerated medications | 30 day supply, multiple waterproof layers, robust cooling system with backup ice |
| Earthquake | Broken bottles, scattered medications, structural damage preventing home access | Crush proof containers, duplicate supplies stored outside home, secure mounting |
| Severe storm | Short term power loss, minor flooding, brief evacuation | 72 hour minimum supply, basic waterproofing, readily accessible location |
Lightweight packing matters for evacuations where you might walk significant distances or carry supplies for extended periods. Wildfires sometimes force evacuations through rough terrain when roads are blocked. Earthquakes can make vehicles unusable. In these situations, every ounce counts. Prioritize the most critical medications and reduce quantities of nice to have items. Transfer pills from heavy glass bottles to lighter plastic containers. Remove excess packaging and bring only what you’ll actually use. Before preparing home risk reduction measures, make sure your medication supplies are secured and ready to grab.
Protect medications from smoke, water, and debris during transit by using multiple protective layers. A waterproof outer bag protects from rain and minor water exposure. Individual ziplock bags for each medication bottle create a second barrier. Hard sided cases prevent crushing during chaotic packing or rough transport. Keep medication containers sealed until you need them. Open air exposure during evacuations increases contamination risk from smoke, ash, floodwater, and airborne debris. If medications get exposed to floodwater, smoke, or other contamination, assume they’re unsafe and replace them as soon as possible rather than risking unknown health effects.
Final Words
You now have a complete system for how to pack medications for evacuation, from gathering supplies to final placement near your exit.
Print your medication list. Label everything. Keep it waterproof.
Check expiration dates every six months and rotate supplies before they expire.
Put your medication kit where you can grab it in under 30 seconds, because when evacuation orders come, you won’t have time to search.
Your family’s health depends on what you pack today, not what you remember in the moment. Start now, while you have time to get it right.
FAQ
What medicines should I stockpile for emergency?
The medicines you should stockpile for emergency include a minimum 72-hour supply of all prescription medications, with a 30-day supply recommended for better protection. Add over-the-counter pain relievers, antihistamines, antacids, anti-diarrheal medication, and any condition-specific supplies like insulin, asthma inhalers, or EpiPens. Include vitamins, topical creams, and medical equipment you use regularly.
What are the 5 P’s of evacuation?
The 5 P’s of evacuation are People (family members and pets), Prescriptions (medications and medical equipment), Papers (important documents and insurance information), Personal needs (clothing and toiletries), and Priceless items (irreplaceable photos and valuables). For medications specifically, focus on gathering all prescription drugs, dosing instructions, doctor contacts, and keeping everything in waterproof containers for quick-grab access.
What are the 10 essential survival kit items?
The 10 essential survival kit items include water (one gallon per person per day), non-perishable food, flashlight with extra batteries, first aid supplies, medications (72-hour minimum supply), important documents in waterproof container, phone charger, cash, whistle for signaling help, and local maps. For medication safety, keep all prescriptions in original labeled bottles, add copies of prescription records, and store everything in waterproof bags.
Do pills need to be in original containers when flying?
Pills need to be in original containers when flying to avoid security delays and prove legitimacy during inspections. TSA recommends keeping prescription medications in pharmacy-labeled bottles with your name, medication name, and dosing instructions clearly visible. This same practice helps during evacuations because first responders, shelter staff, or medical personnel can quickly identify your medications and dispense them correctly if you cannot.